

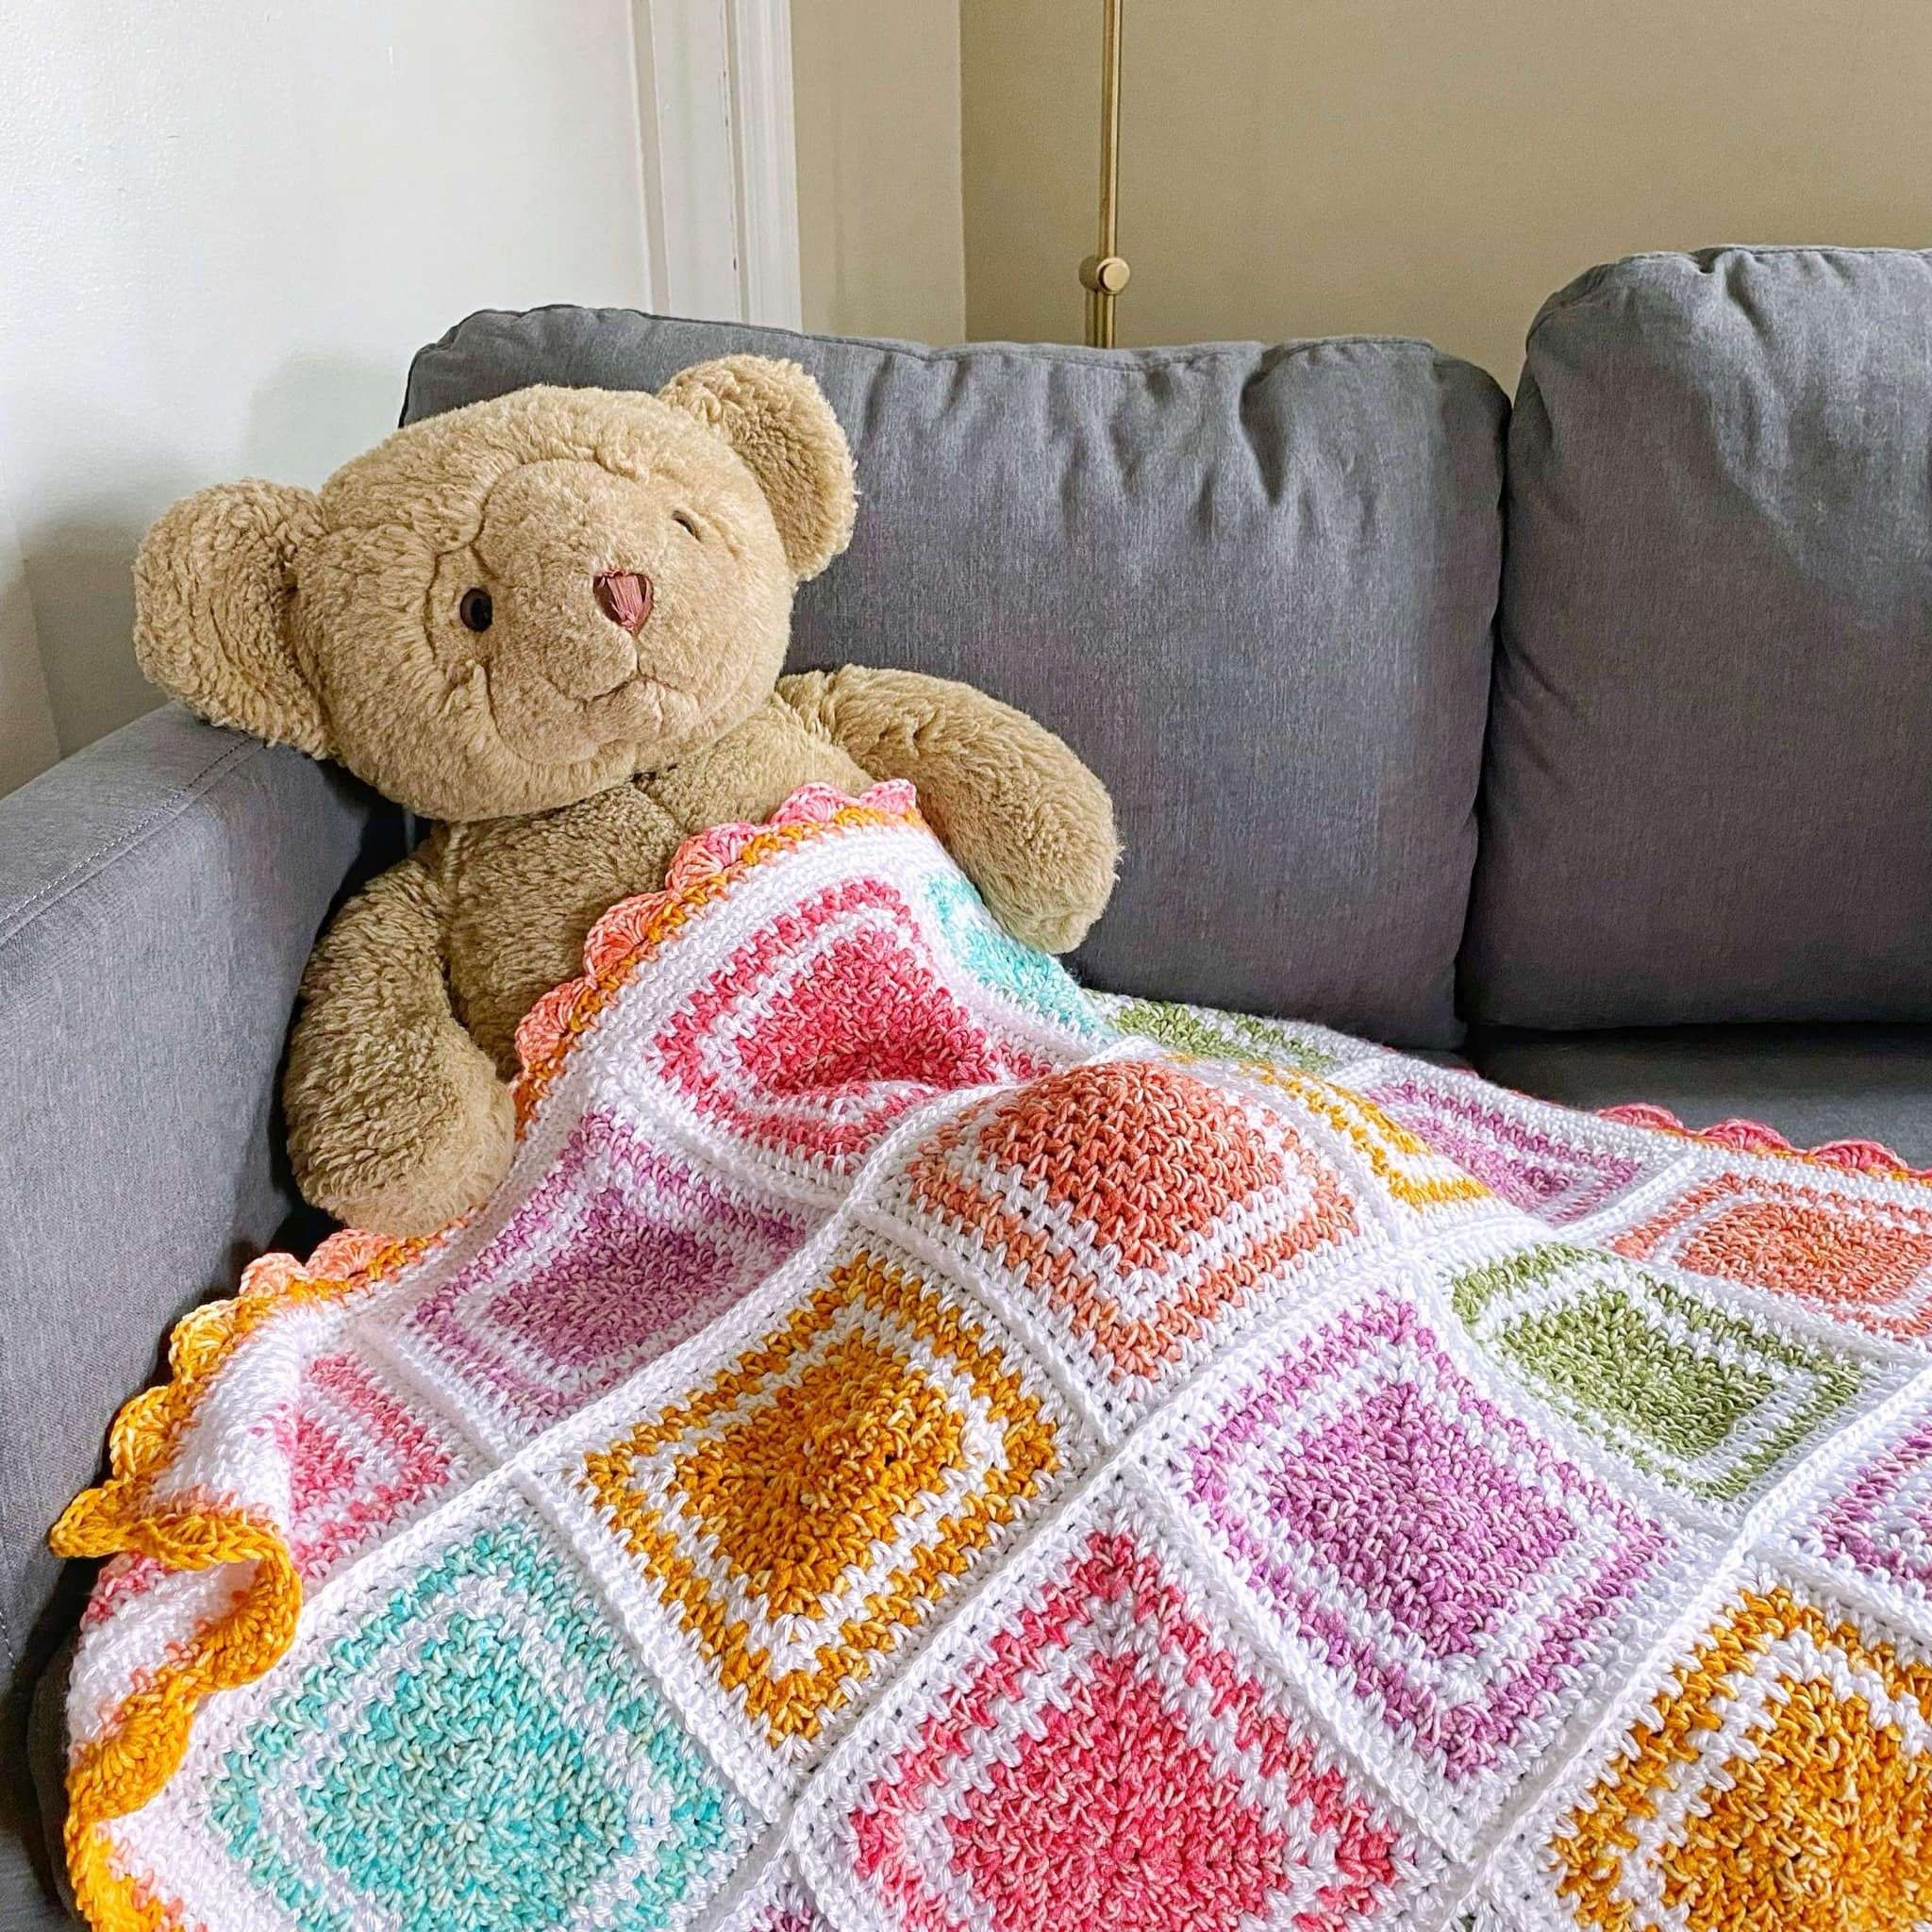
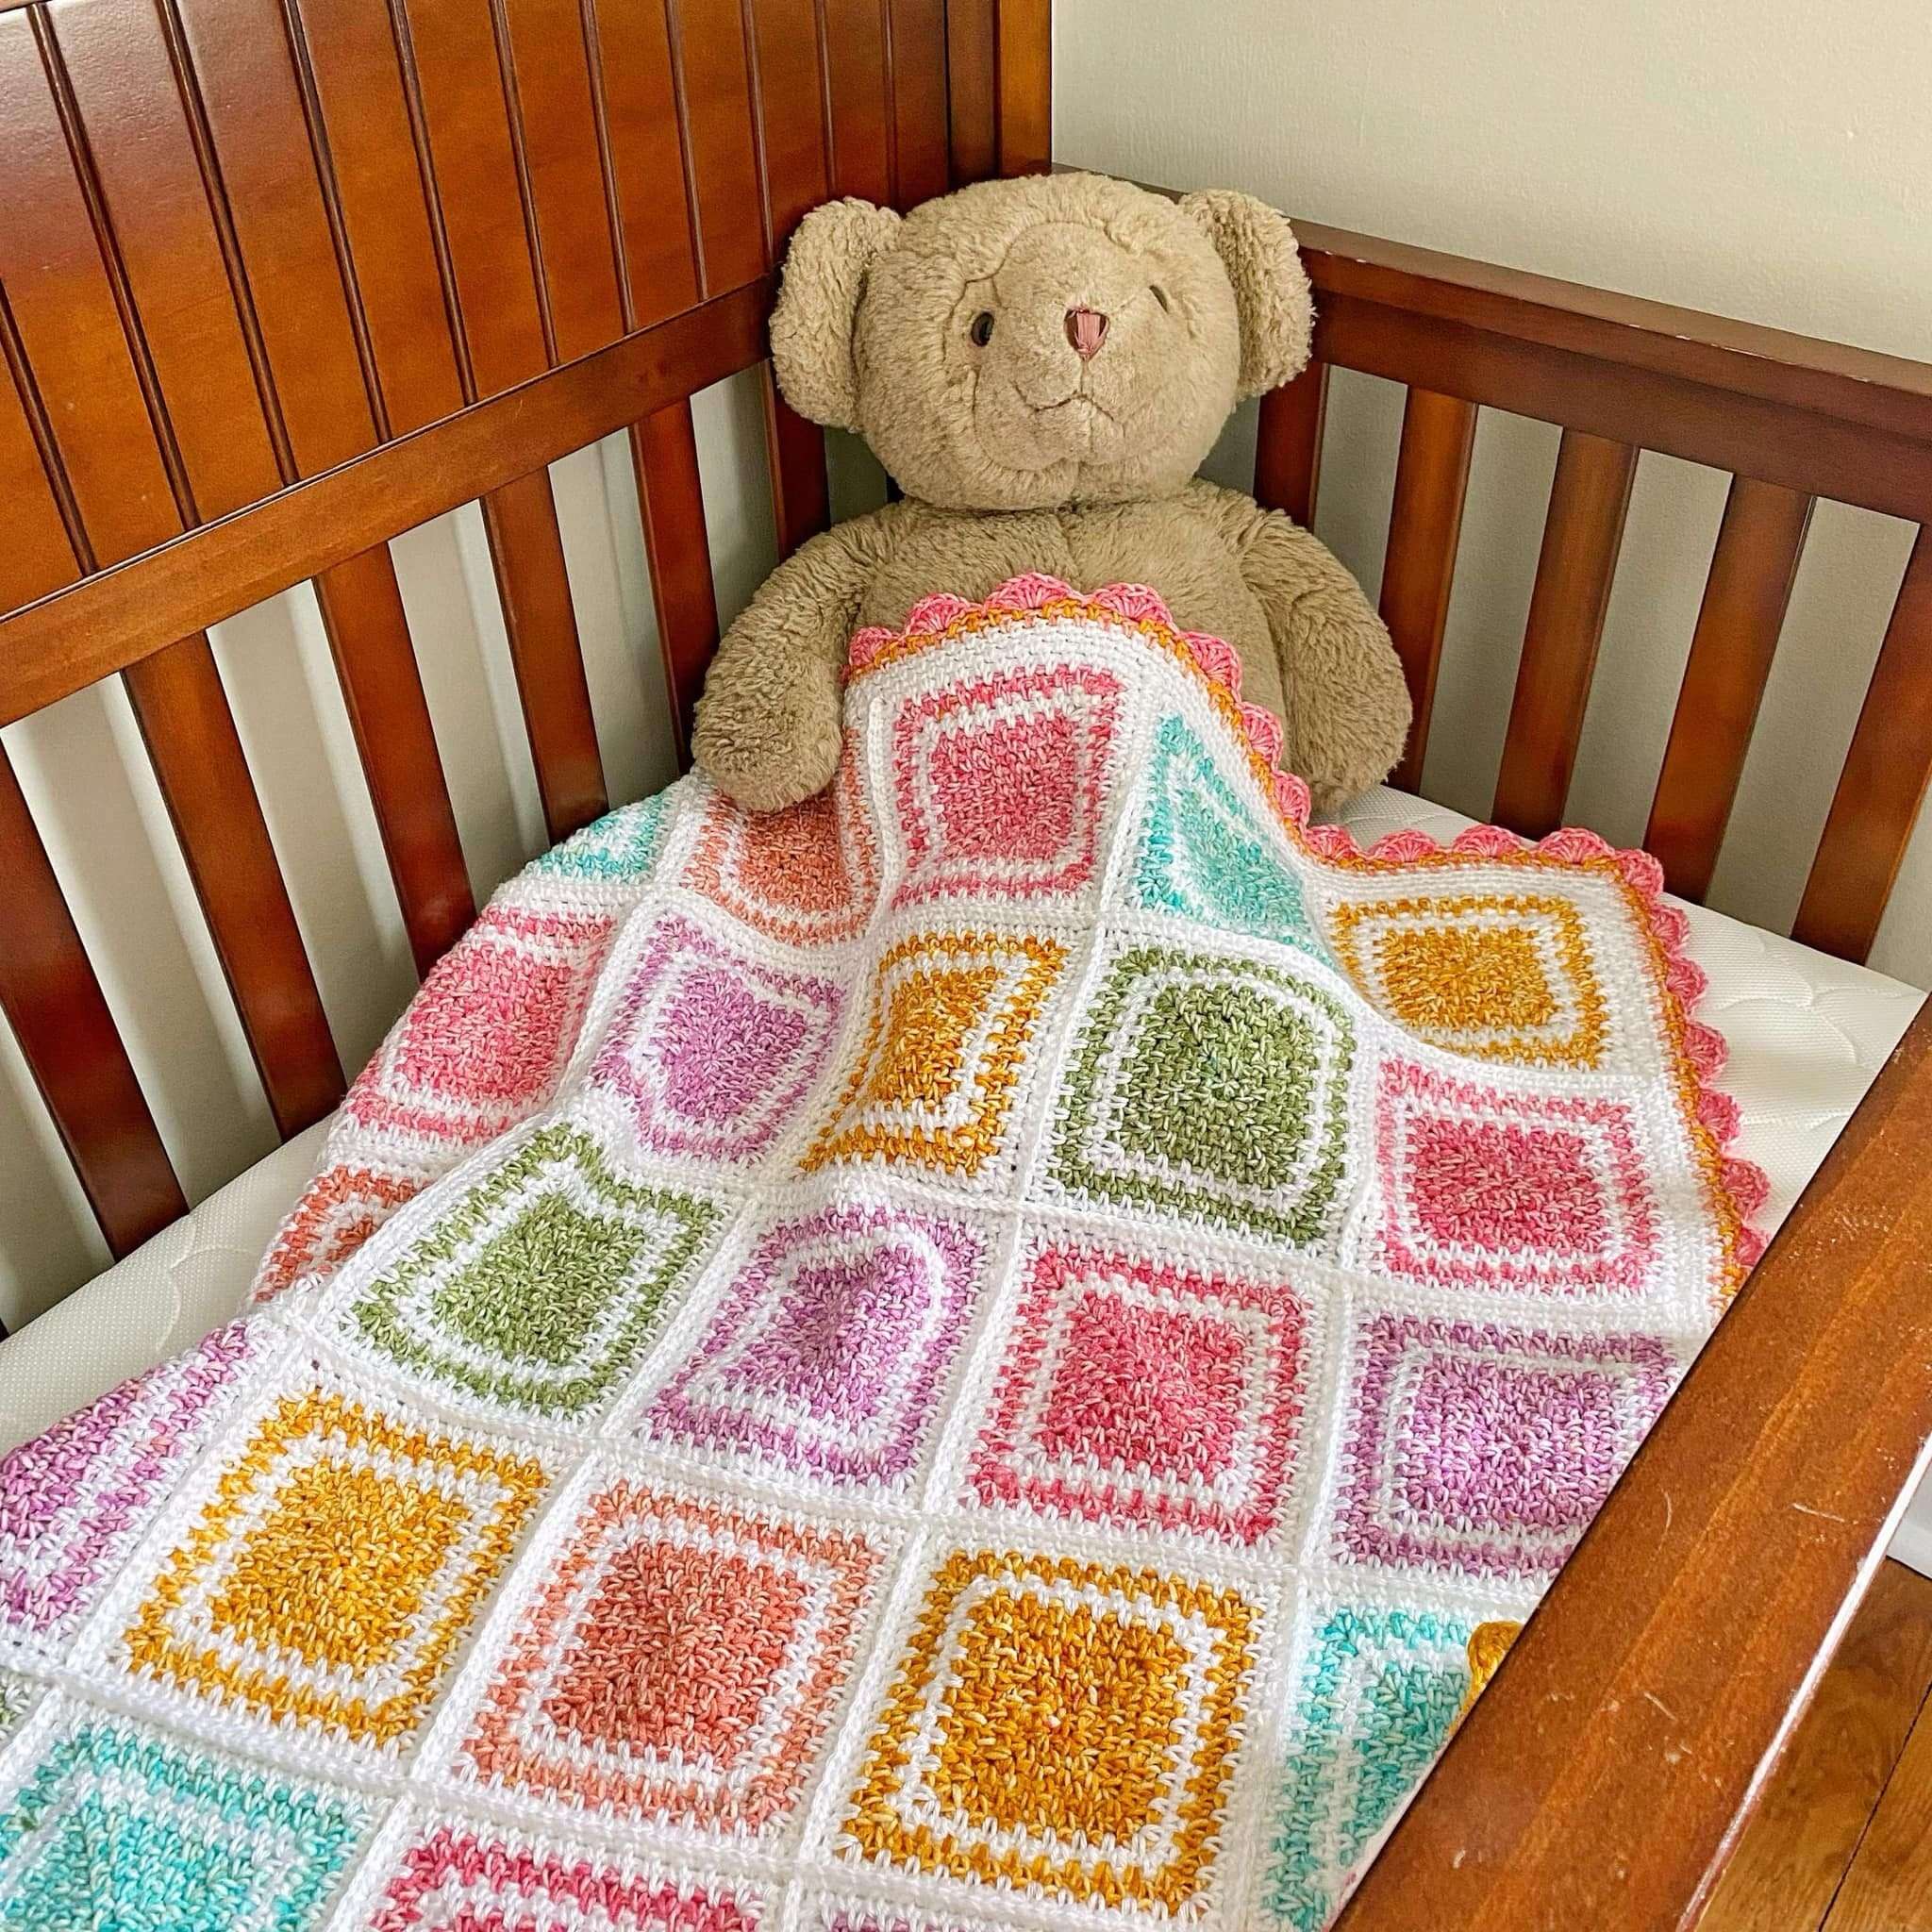
Hi guys! It’s baby shower season, so we are back with another baby blanket to add to our collection: the Cotton Candy Parade Blanket. This is a colourful moss stitch granny square blanket made up of individual squares that are joined together as you crochet.
I used self-striping yarn for my blanket, but this would be a perfect scrapbuster project to help you use up your scrap/stash yarn.
You can find the free pattern for the baby blanket size (37″ x 37″), along with instructions to create a customize sized blanket below. I hope you enjoy making this colorful, striped baby blanket.
If you prefer to print the pattern, the ad-free printable PDF includes step-by-step pictures, video tutorials, and instructions to make 7 blanket sizes (Baby Blanket (37” x 37”), Lapghan (43” x 50”), Small Throw (50” x 63”), Medium Throw (56” x 69”), Large Throw (63” x 82”), Queen (89” x 89”), and King (95” x 95”), along with instructions to customize the size of your blanket.
Pin this Moss Stitch Granny Square Blanket – HERE!
Pinning this pattern really makes a difference because it gets the pattern circulating, so other crocheters can see it. Thank you for taking the time to pin this Cotton Candy Parade Blanket pattern!

This post contains affiliate links that support the content on ThisPixieCreates. Find more information about affiliate links, as well as my Privacy & Disclosures Policy here.
Materials:
Optional Materials:
- Steamer or Spray Bottle
- Straight Pins or Blocking Pins
- Blocking Mat or Foam Board
Yarn:
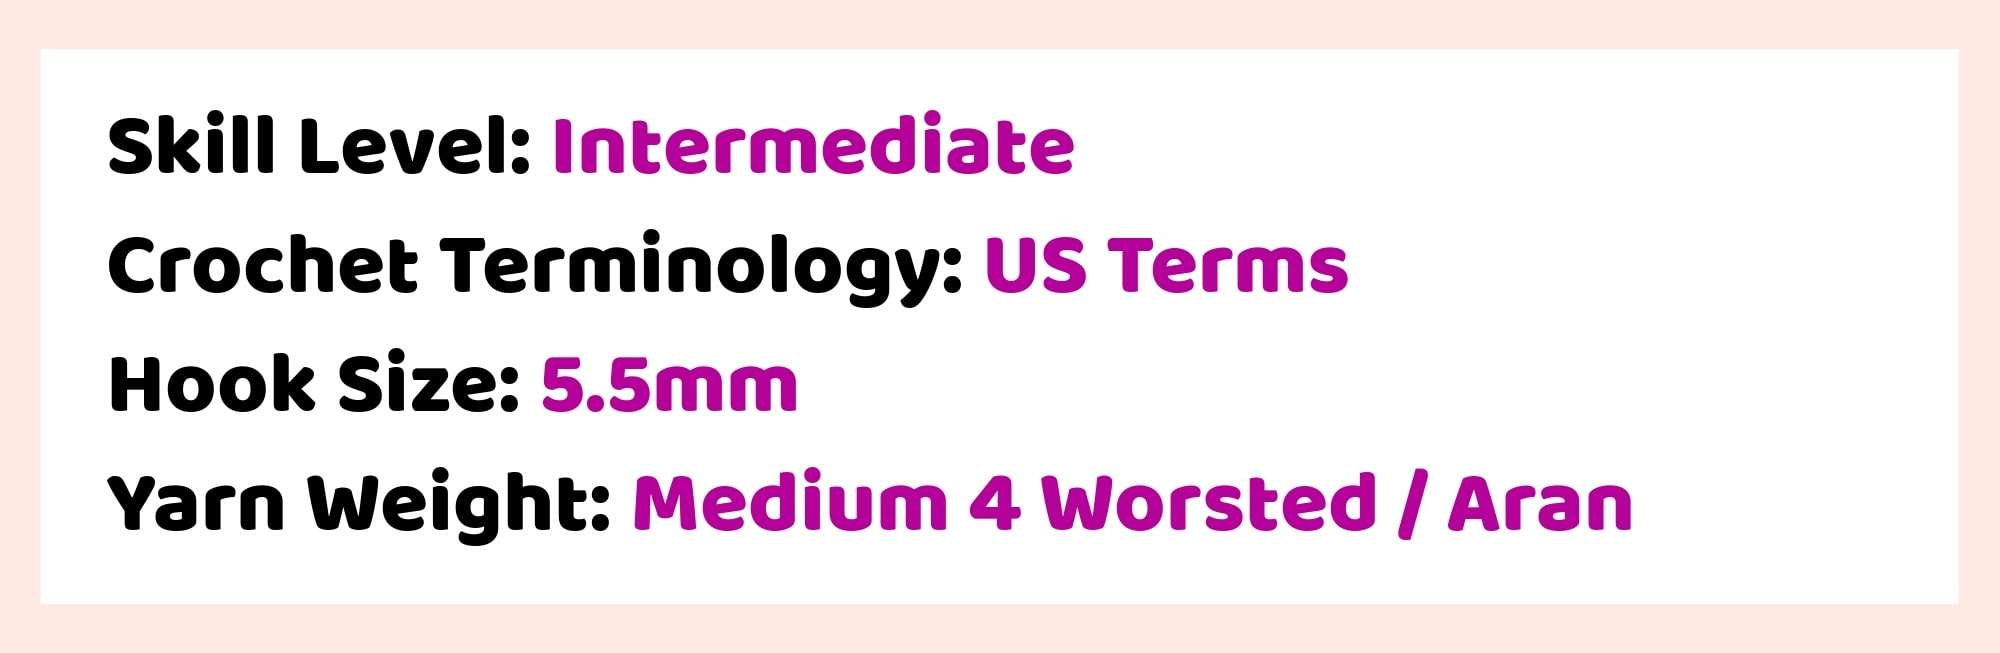
- Yarn Note: You can use ANY medium 4 (worsted/aran) weight yarn as a substitute. You can use self-striping yarn or solid coloured yarn, depending on your preference.
- Lion Brand Mandala Ombre, Weight 4 Medium (100% Acrylic, 344 yd / 315 m, 150 g / 5.3 oz)
- Colour A: Tranquil
- Lion Brand Mandala Ombre is a self-striping yarn that has the following colours in each cake: purple, pink, orange, coral, aqua, green.
- Caron Simply Soft, Weight 4 Medium (100% Acrylic, 315 yd / 288 m, 170 g / 6 oz)
- Colour B: White
Yardage:
- Colour A: 800 yds / 732 m (3 skeins)
- Colour B: 700 yds / 640 m (3 skeins)
- Total: 1500 yds / 1372 m
Per 1 Square (Gauge):
Yardage: Colour A (27 yds / 25 m), Colour B (24 yds / 22 m), Total (51 yds / 47 m)
Pattern Measurements: 6.5” wide x 6.5” long
Number of Rnds: 13
Abbreviations:
- St – stitch
- Ch – chain
- Sp – space
- Sk – skip
- Sl st – slip stitch
- Sc – single crochet
- Sc2tog – single crochet decrease
- Dc – double crochet
- Rnd – round
- YO – yarn over
- WS – wrong side
- RS – right side
- MR – magic ring
Pattern Measurement:
- With Border: 37″ x 37″
- Without Border: 33″ x 33″
- If you’d like to create a custom sized blanket, please see the instructions below under the “Customize the Size of your Blanket” heading.
Customize the Size of your Blanket:
If the blanket sizes above are not the right size, you can create your own custom sized moss stitch square blanket by making any number of squares and joining them together. Each square measures approximately 6.5” wide x 6.5” long, and the border adds approximately 4” to the length and width of the blanket.
To determine the size of your blanket:
- Choose the number of columns (Width): Ex. 5 squares
- Choose the number of rows (Length): Ex. 4 squares
- Total Squares Needed: Columns x Rows = 5 x 4 = 20 squares
- Blanket Width: 5 squares x 6.5” = 32.5” + 4” (Border) = 36.5” wide
- Blanket Length: 4 squares x 6.5” = 26” + 4” (Border) = 30” long
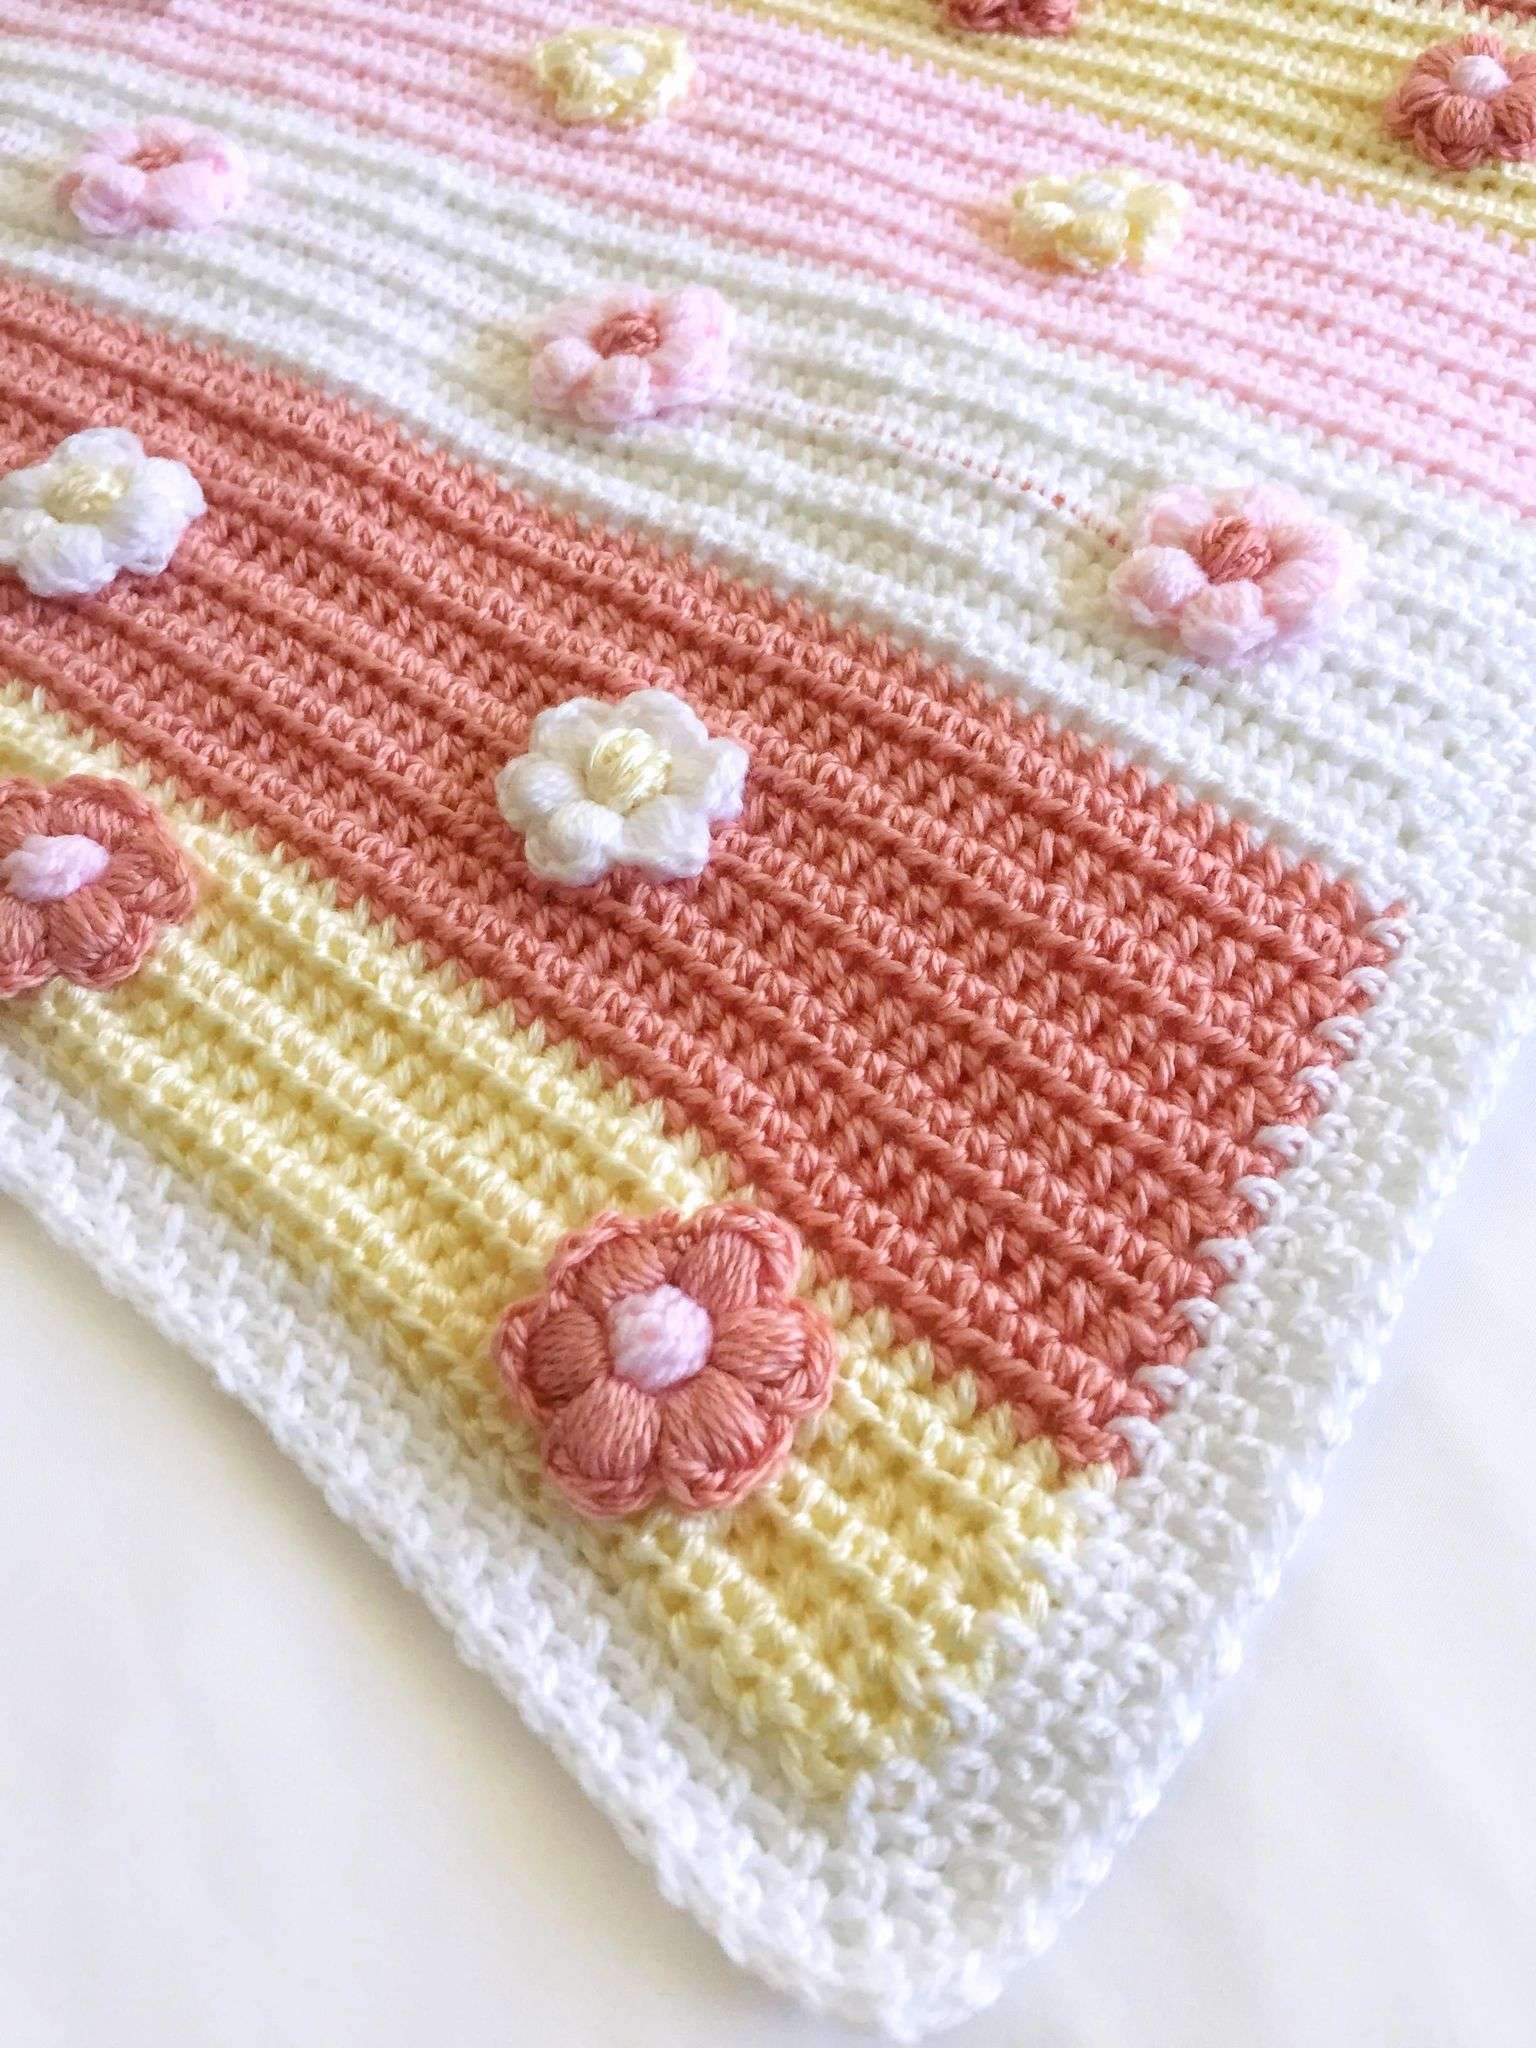
Other Crochet Baby Blankets You’ll Love!


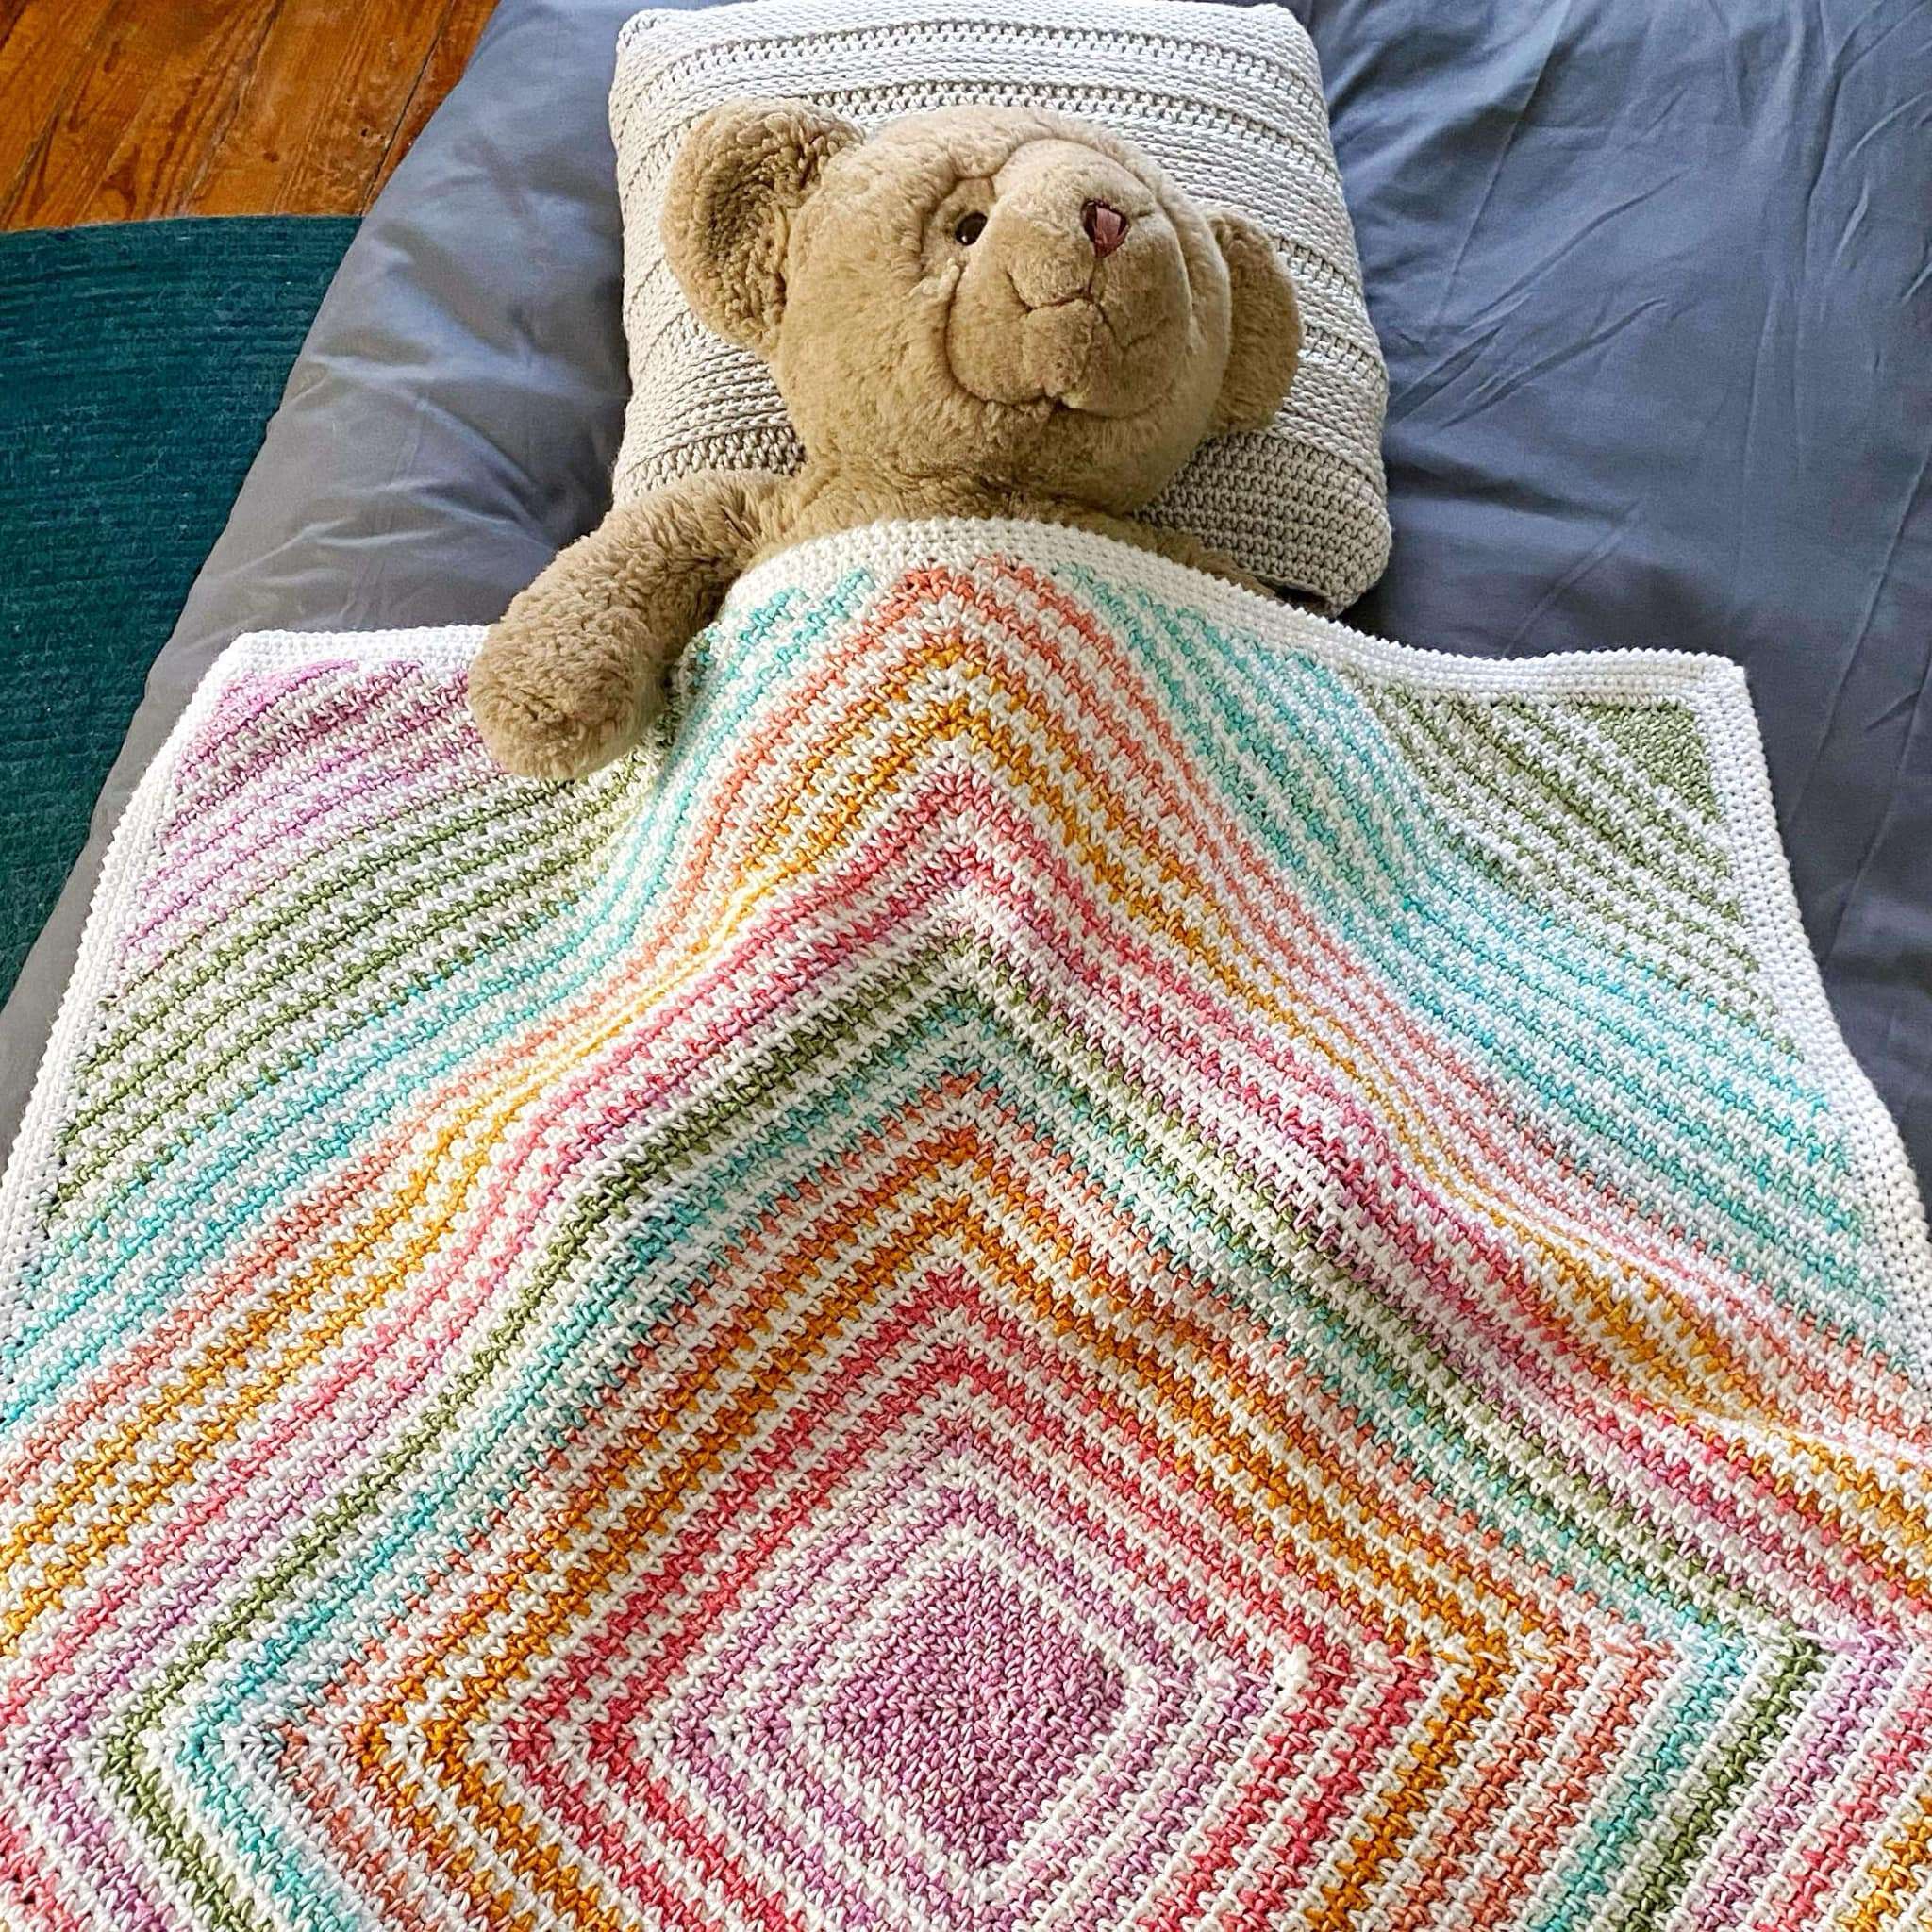
This blanket has been added to the 20+ Crochet Blanket Bundle on Etsy and Ravelry. If you purchased the bundle through Ravelry, then you should receive an email with a link to download your pattern; if you purchased through Etsy, check the Google Drive bundle to download your pattern.
Changing Colour Tutorial:
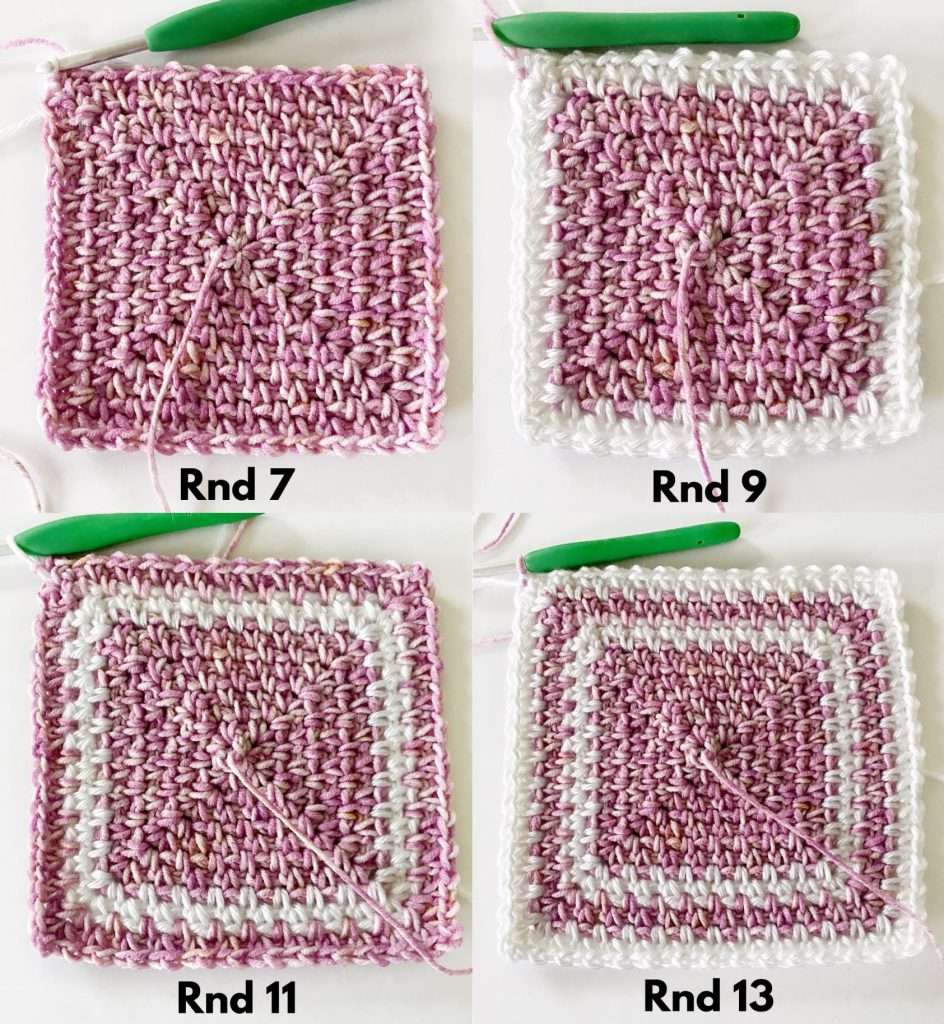
At the end of Rnd 7: Before making the final sl st to close Rnd 7, drop Colour A, and pick up Colour B (to make the join more secure, make a slip knot with Colour B and place it on the hook). Pull Colour B through the st and the loop on the hook, to complete the sl st and change colours! Do not cut Colour A; keep it attached to your work because you’ll need it for Rnd 10.


At the end of Rnd 9 & 11: Before making the final sl st to close the rnd, drop the current colour (beige), and let it hang from the back of your work because you will need it for future rnds. Pick up the unused colour (rust), and pull it through the st and the loop on the hook, to complete the sl st and change colours!


Video Tutorial:
Here is a video tutorial to get you started with the Cotton Candy Parade Baby blanket. It walks you through Rnds 1 – 4 of the square, and how to change colour at the end of Rnd 7 and 9. Timestamps are included in the description box of the video, so you can skip to the part(s) you need.
Pattern:
Notes:
- The beginning ch of each rnd does NOT count as a st.
- After Rnd 1, each rnd starts in the corner ch-2 sp.
- Odd numbered rnds are considered the RS and even numbered rnds are considered the WS – you can see the colour changes on the WS.
- The moss stitch square baby blanket is made up of 25 individual squares that are joined together with crochet at the end of the project. You can also sew them together using the whip or mattress stitch if you’d prefer.
- Yarn is carried in each square. After joining the new colour, drop the old colour. If you need it for future rnds, leave it, and pick it up for these rnds. If you no longer need the colour, leave a tail, and cut the strand. To change colours between rnds, see the tutorial above.
- You can find a step-by-step photo tutorial for making a moss stitch square HERE!
Square (Make 25)
With Colour A, make a MR.
Rnd 1 (RS):
Ch 1, [sc, ch 2] 4 times in MR. Join last ch 2 to first sc with a sl st. Turn.
- Stitch Count: 4 sc, 4 ch-2 sp
Rnd 2 (WS):
Ch 1, (sc, ch 1) in first ch-2 sp. [(Sc, ch 2, sc, ch 1) in next ch-2 sp] 3 times. (Sc, ch 2) in first ch-2 sp of the rnd to complete the first corner. Join with a sl st. Turn.
- Stitch Count: 8 sc, 4 ch-2 sp, 4 ch-1 sp
Rnd 3 (RS):
Ch 1, (sc, ch 1) in first ch-2 sp. [(Sc, ch 1) in ch-1 sp, (sc, ch 2, sc, ch 1) in ch-2 sp] 3 times. (Sc, ch 1) in ch-1 sp. (Sc, ch 2) in first ch-2 sp of the rnd to complete the first corner. Join with a sl st. Turn.
- Stitch Count: 12 sc, 4 ch-2 sp, 8 ch-1 sp
Rnd 4 (WS):
Ch 1, (sc, ch 1) in first ch-2 sp. [(Sc, ch 1) in each ch-1 sp until next ch-2 sp, (sc, ch 2, sc, ch 1) in ch-2 sp] 3 times. (Sc, ch 1) in each ch-1 sp until first ch-2 sp. (Sc, ch 2) in first ch-2 sp of the rnd to complete the first corner. Join with a sl st. Turn.
- Stitch Count: 16 sc, 4 ch-2 sp, 12 ch-1 sp
Rnds 5 – 13:
Repeat Rnd 4, while following the colour changes below.
- Colour Changes:
- Rnds 1 – 7: Colour A
- Rnds 8 – 9: Colour B
- Rnds 10 – 11: Colour A
- Rnds 12 – 13: Colour B
- Every rnd increases by 4 sc and 4 ch-1 sp.
- Rnd 13 should have a stitch count of 52 sc, 4 ch-2 sp, 48 ch-1 sp.
Repeat Rnds 1 – 13 to make a total of 25 squares.
Join the Squares Together:
To join the squares, we are going to make two passes – a first join (horizontal to join the rows) and a second join (vertical to join the columns) – to ensure that all the sides are joined.
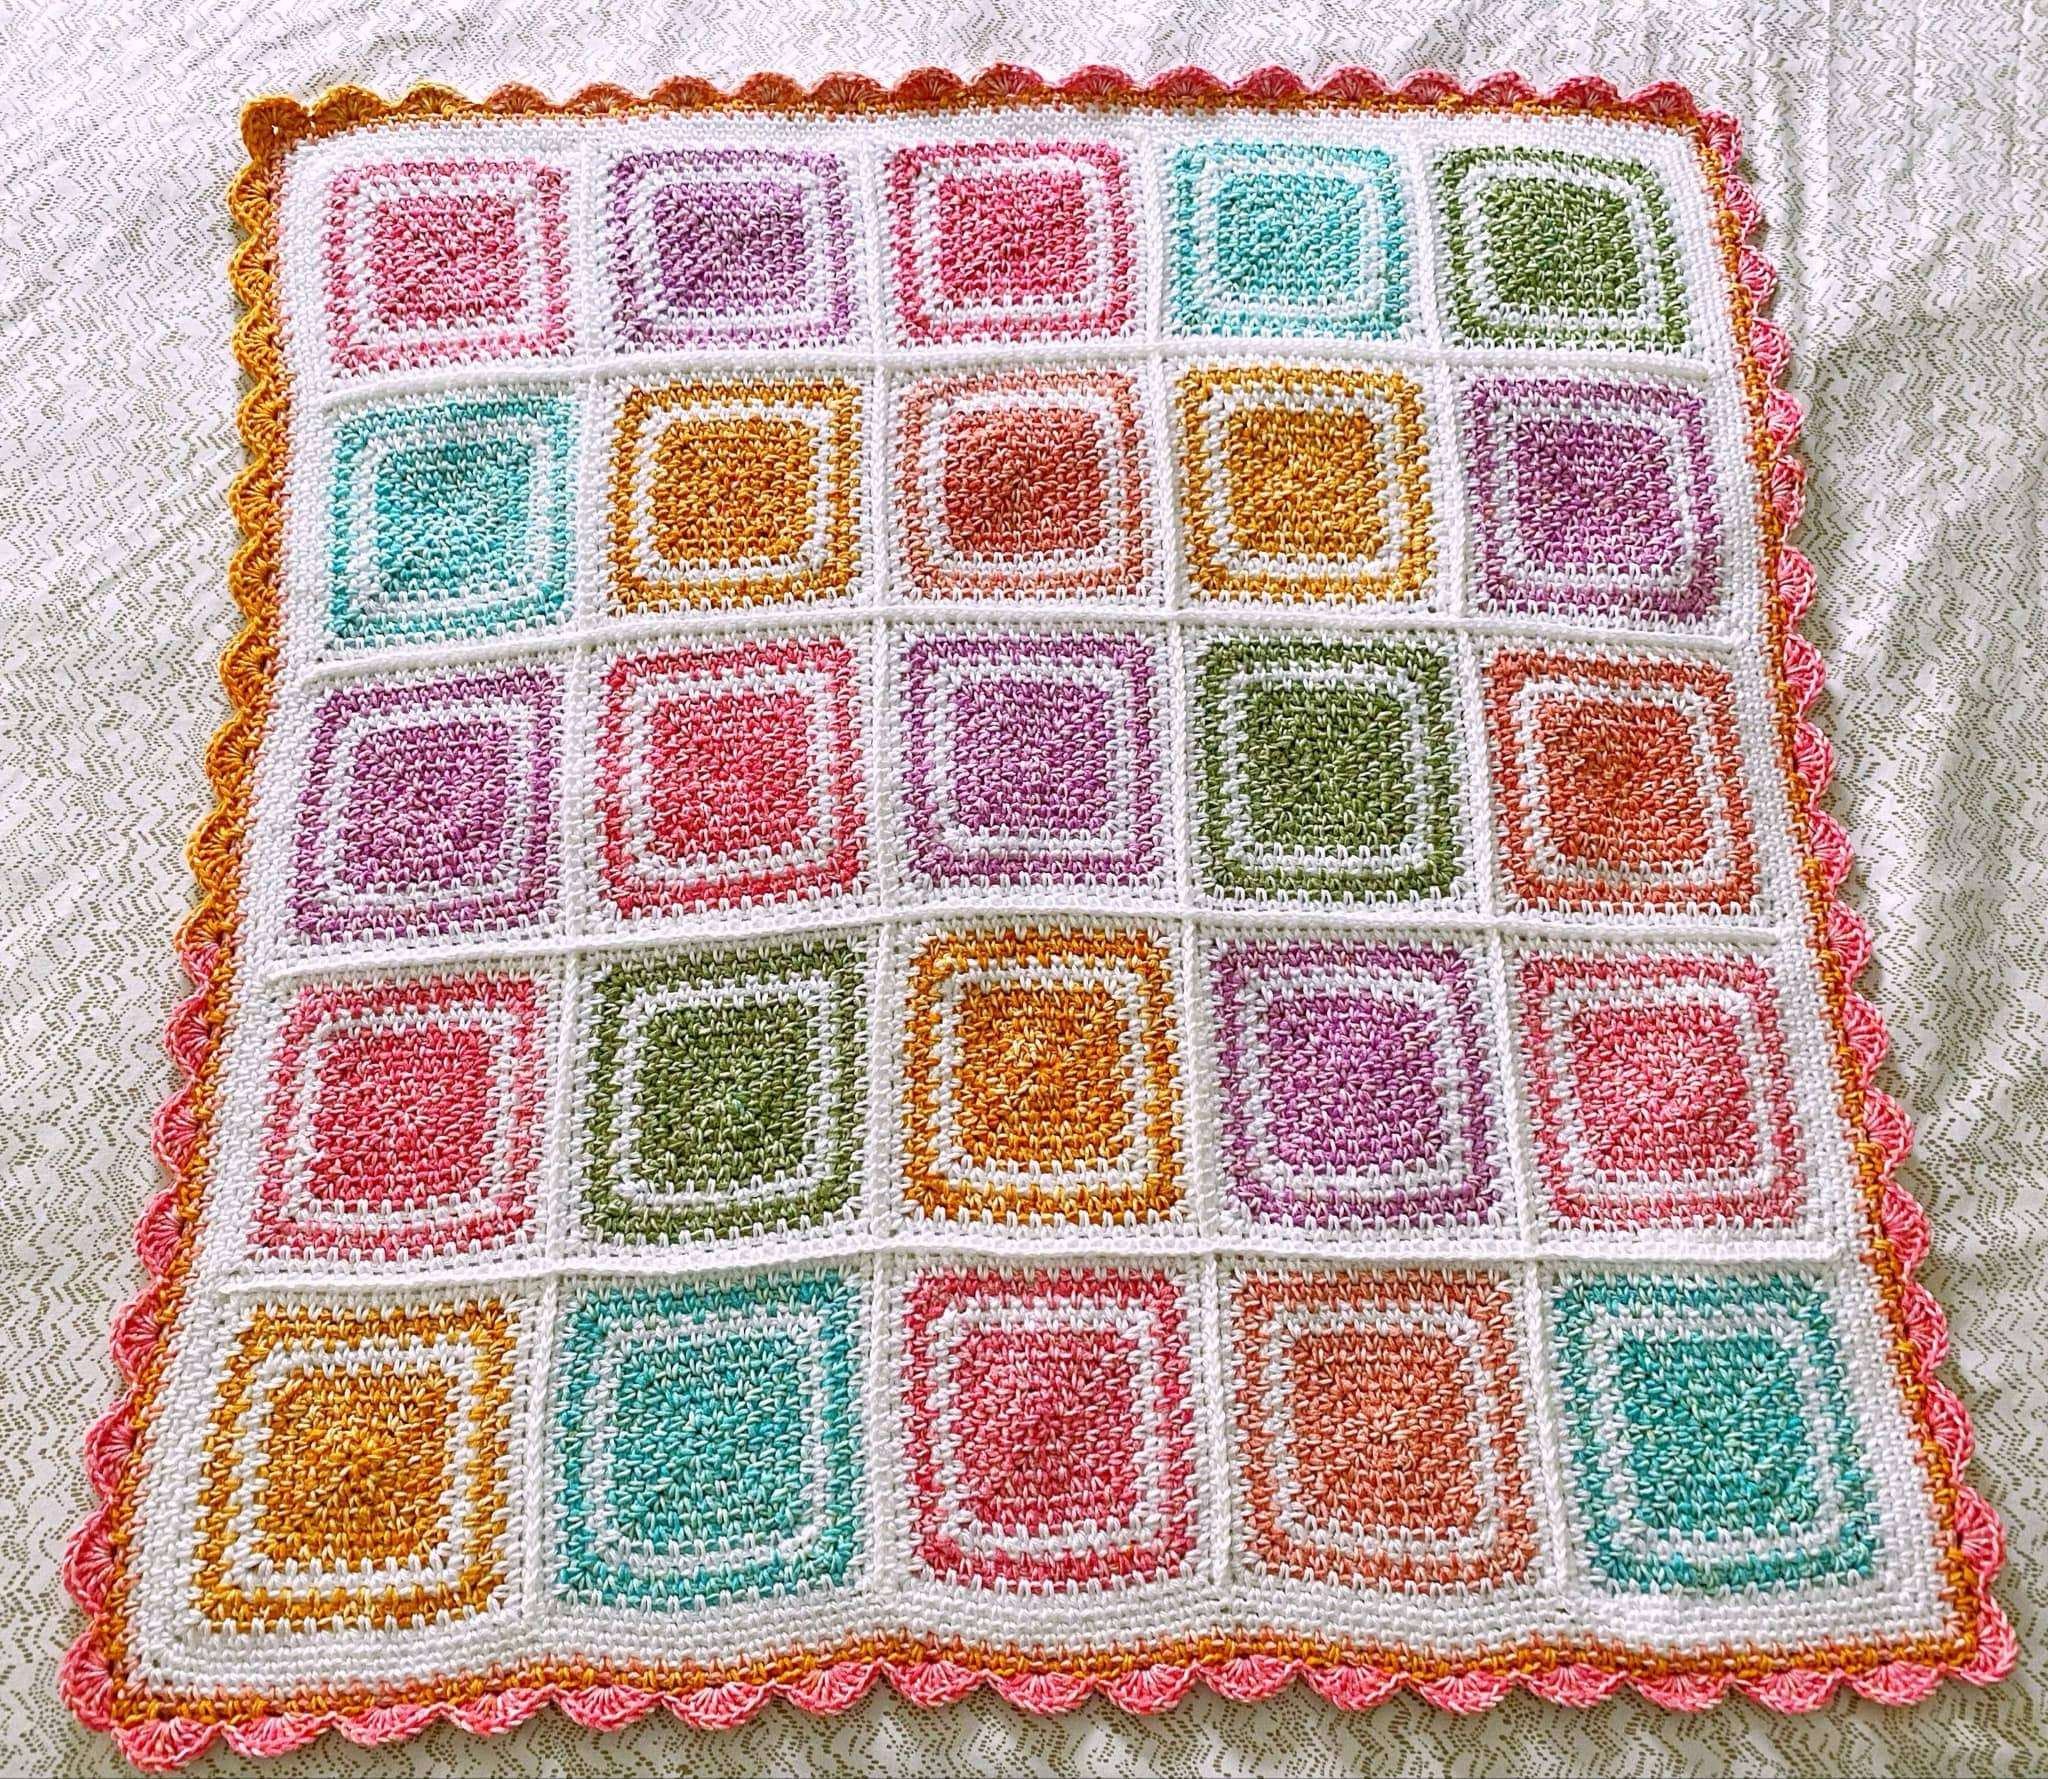
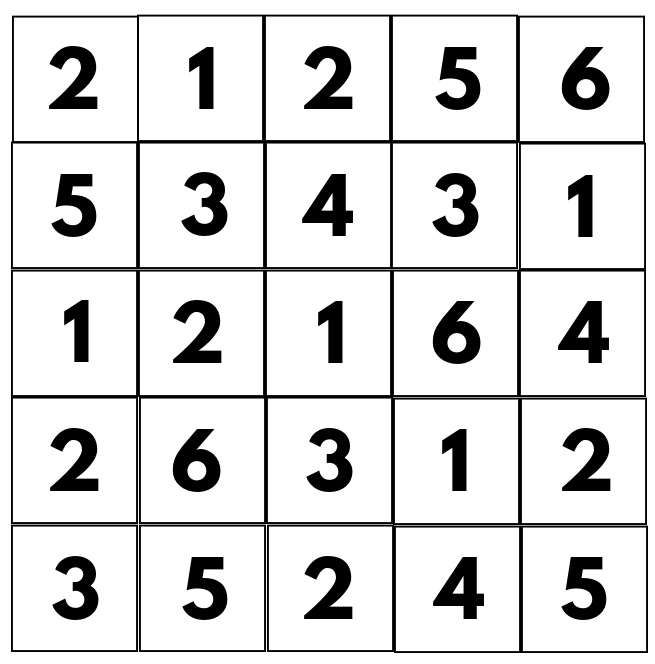
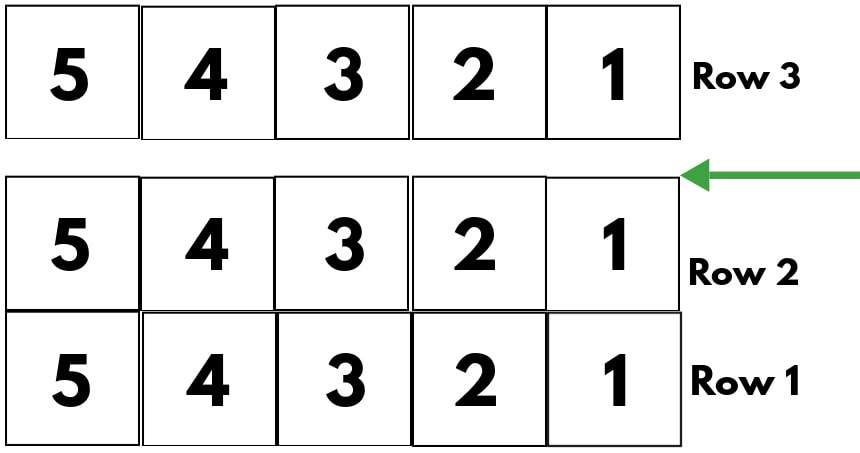
Step 1: Layout your blanket according to the diagram below (5 squares wide x 5 squares long).
- For my blanket, I used a self-striping yarn: Lion Brand Mandala Ombre in the colour Tranquil. It alternates between the following colours: Purple (1), Pink (2), Orange (3), Coral (4), Blue (5), Green (6).
- The numbers in the diagram represent the 6 different colours in the yarn, and where they are placed.
- If you choose to use this yarn for your blanket, please keep in mind that each skein is different and has a different colour order, so you may get more/less squares of each colour.
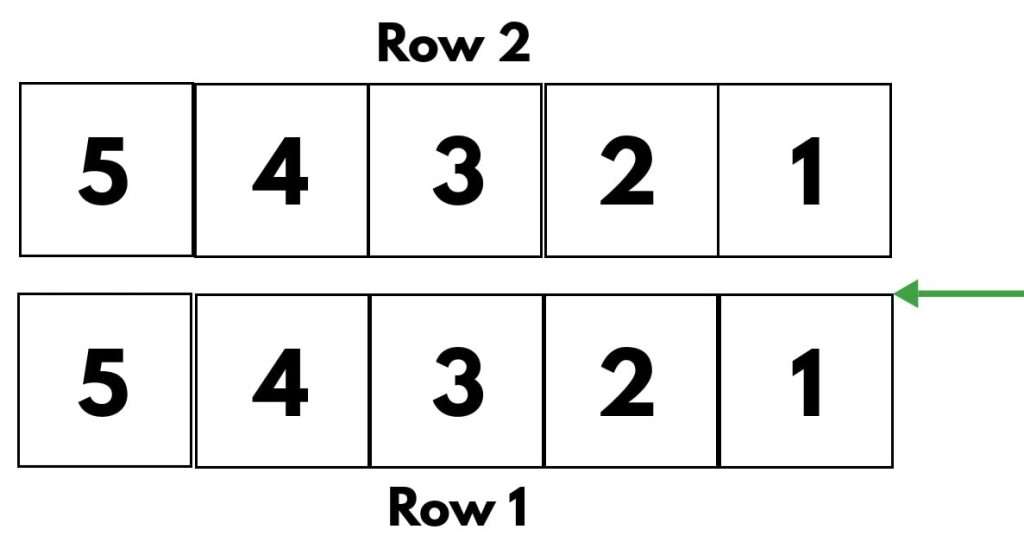
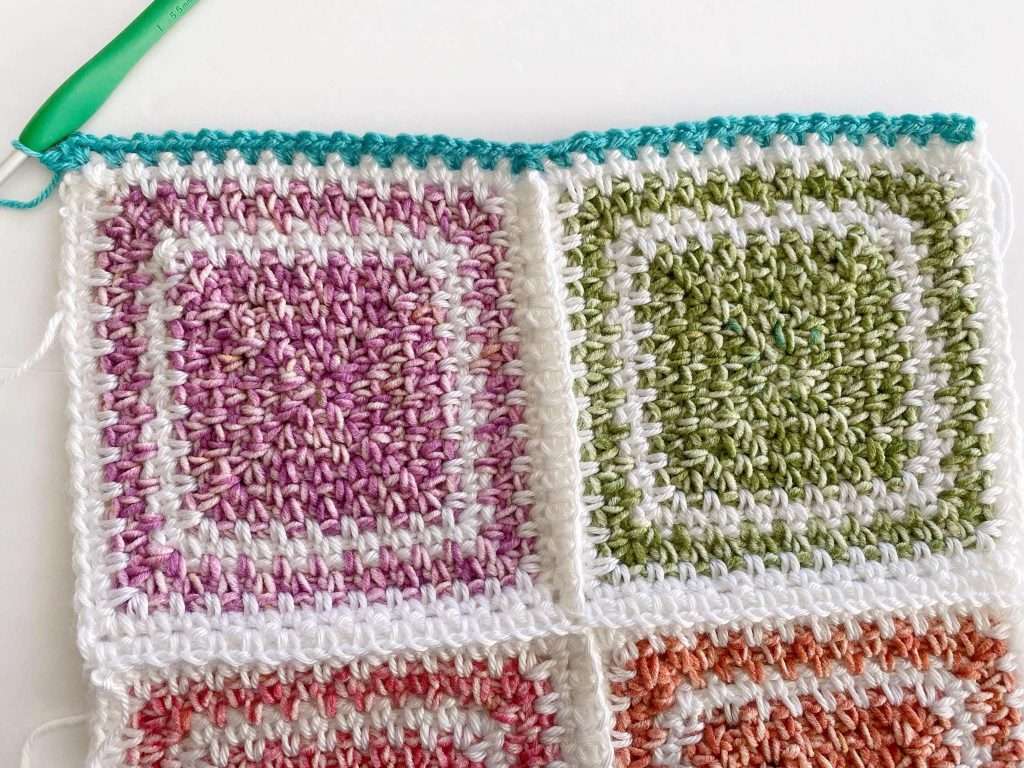
Step 2 (First Join – Rows): Each row is joined to the row above it. Starting with Row 1, join each square across the row to the matching squares of Row 2.
- Insert hook into the top-right corner ch-2 sp of Square 1 of Row 1. Pick up Colour B with your hook and pull it through the ch-2 sp to fasten on. Ch 1.
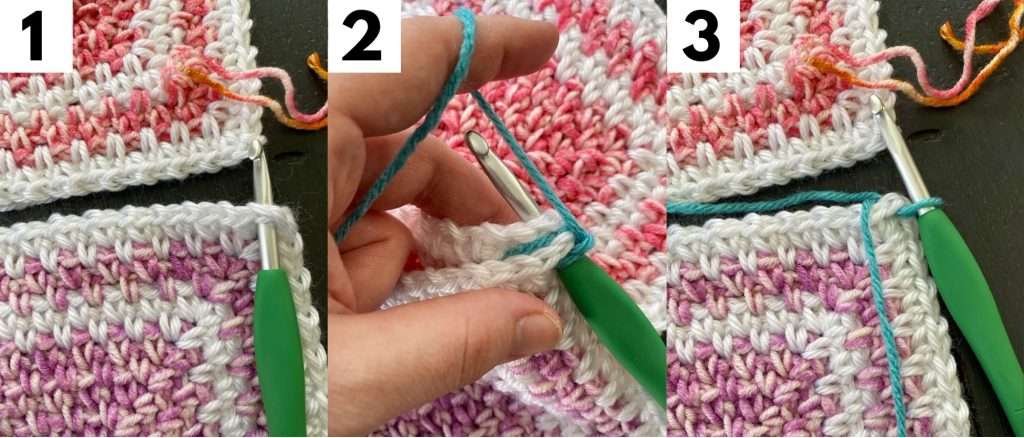
- { Insert hook into the first corner ch-2 sp of Square 1 Row 1, and the matching corner ch-2 sp of Square 1 Row 2 and make a (sc, ch 1) to join.
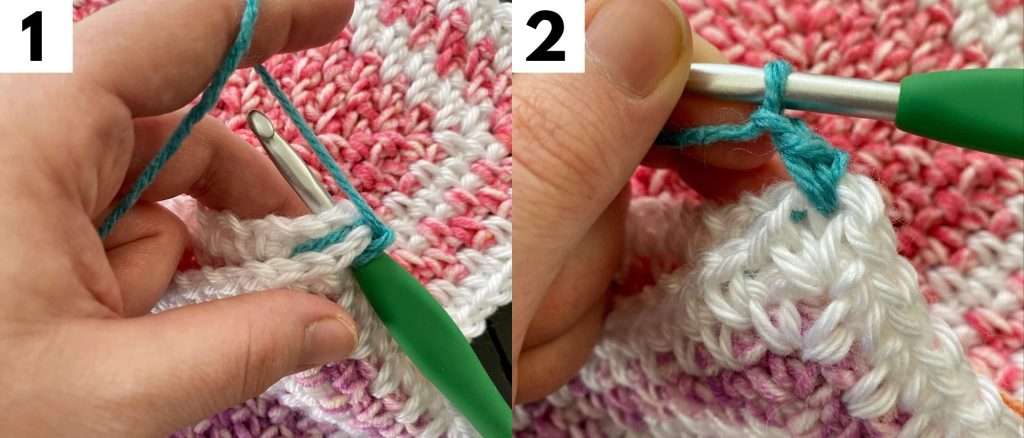
- (Sc, ch 1) in every ch-1 sp of the two squares across.
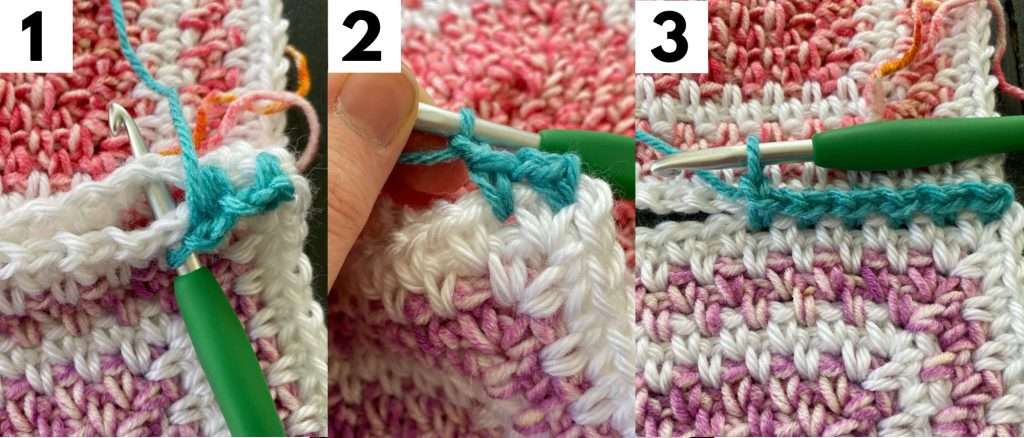
- Sc in the last corner ch-2 sp of the two squares. Do not ch 1.}
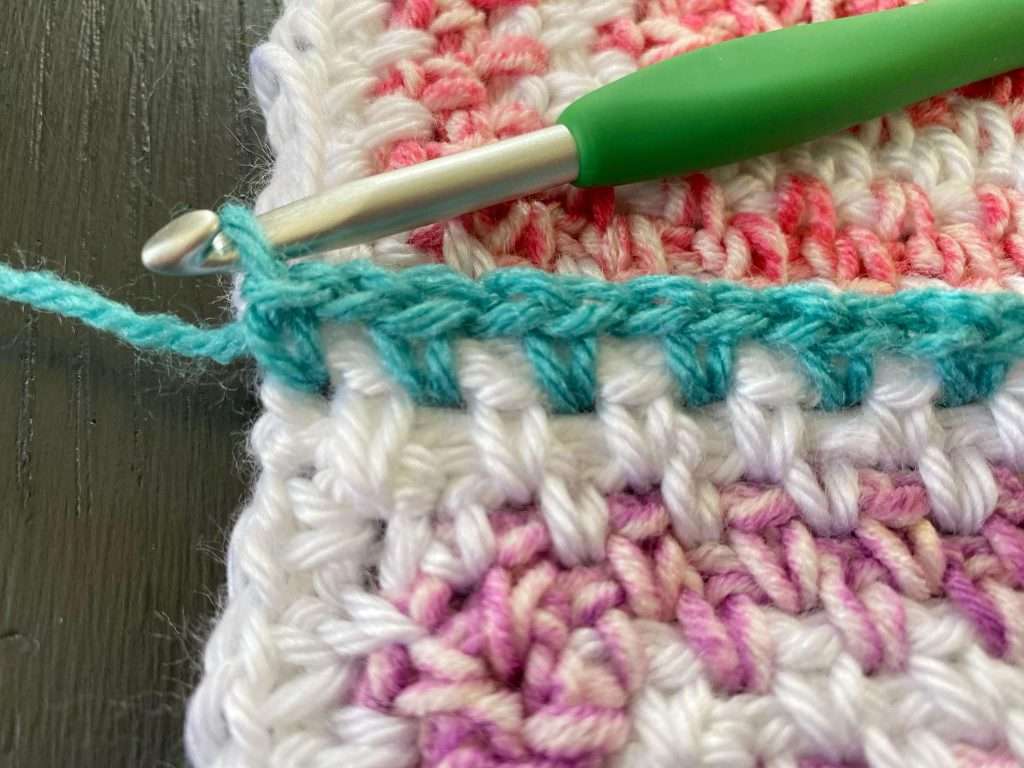
Repeat this process from { to } to join each square across the row. To fasten off, YO and pull through the loop on the hook to make a long tail, then trim it. Pull tight to make the knot secure.
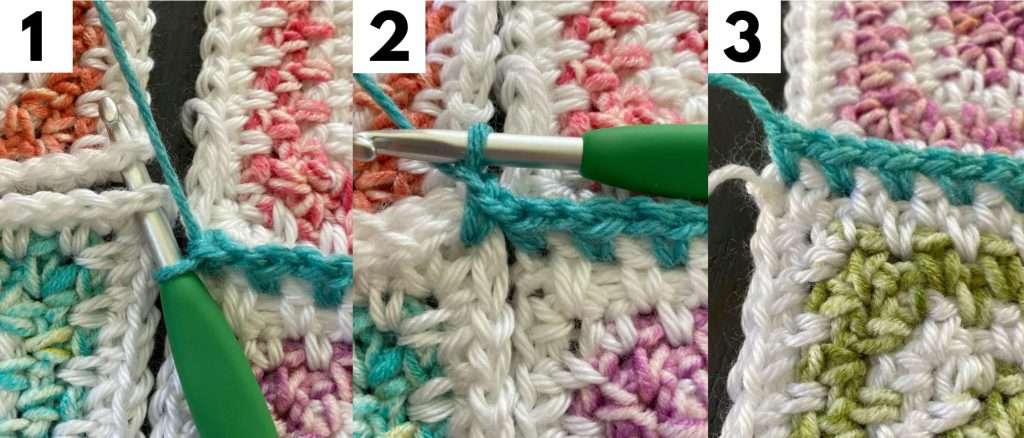
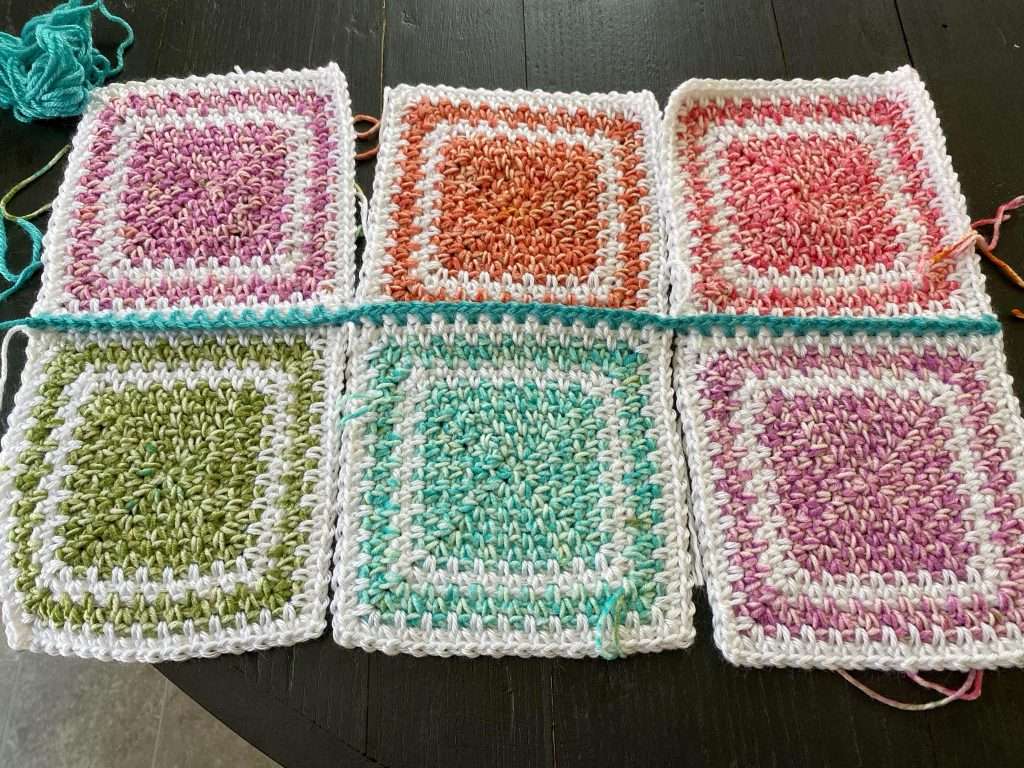
- To join the next two rows (ie. Row 2 and 3), insert hook into the top-right corner ch-2 sp of Square 1 of Row 2. Pick up Colour B with your hook and pull it through the ch-2 sp to fasten on. Ch 1.
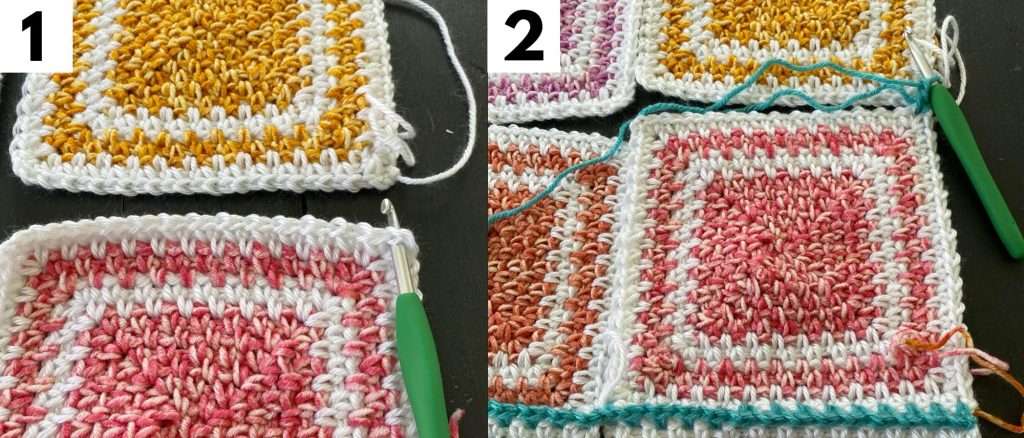
- Repeat the process from { to } to join each square across the two rows.
- Continue to repeat Step 2 until all rows of the blanket are joined.
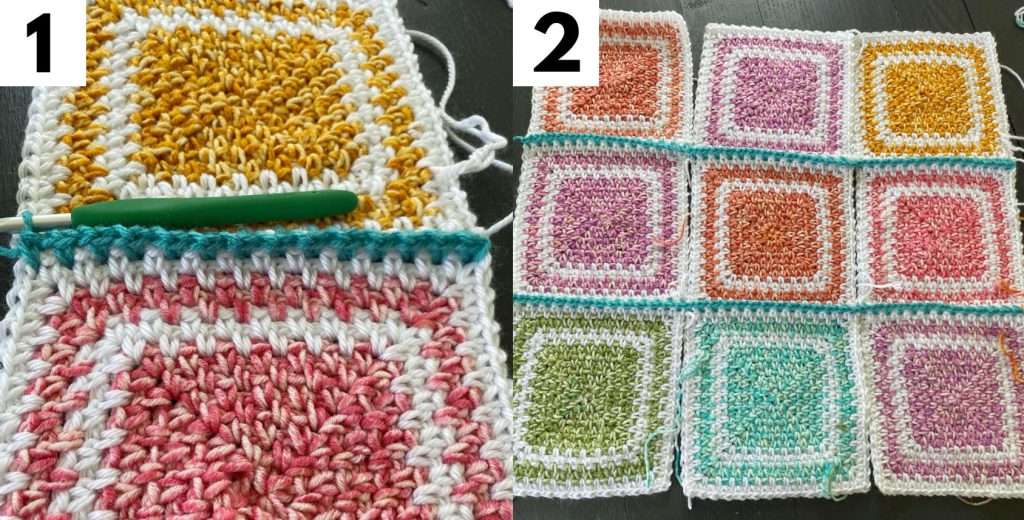
Step 3 (Second Join – Columns): Each column is joined to the one beside it.
- Rotate the blanket 90 degrees, so you can crochet each column join like a row join (right-to-left across the horizontal).
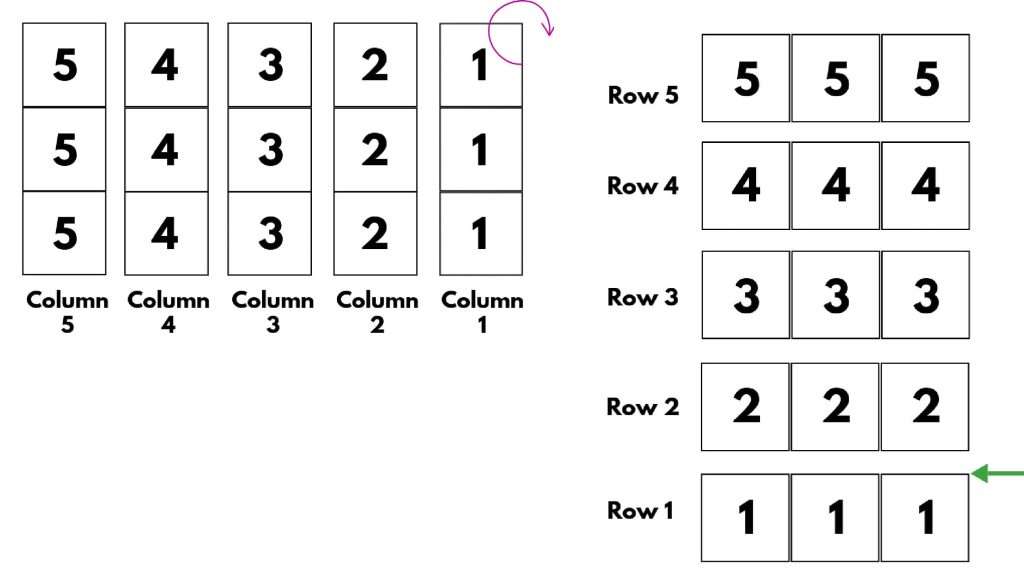
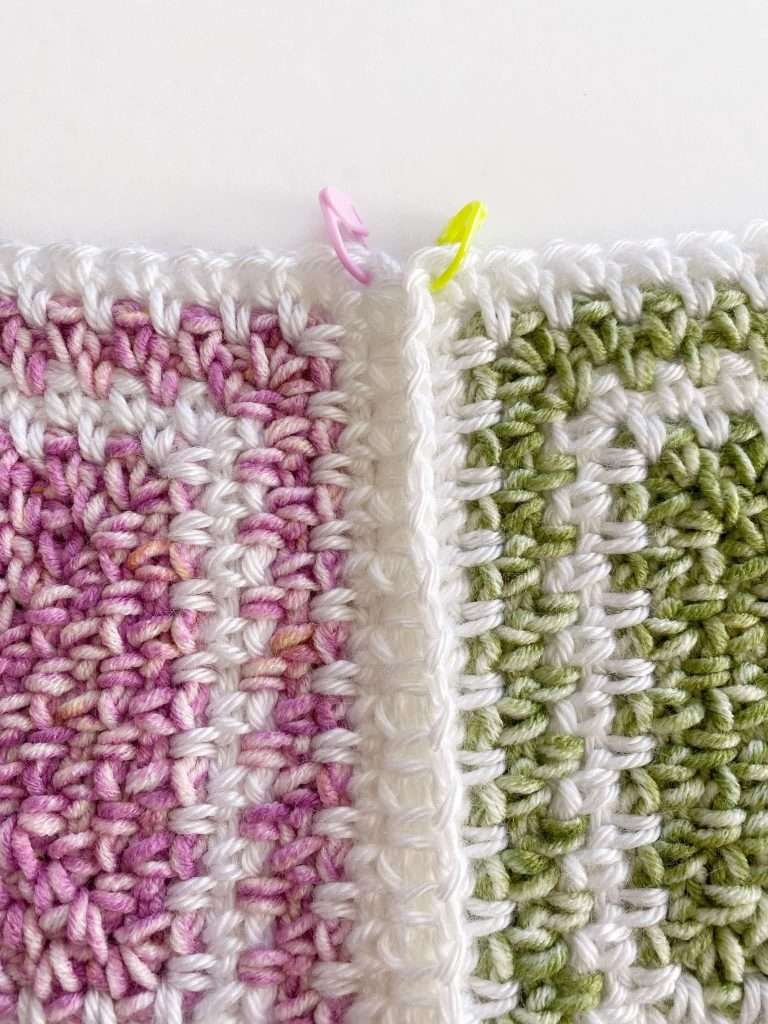
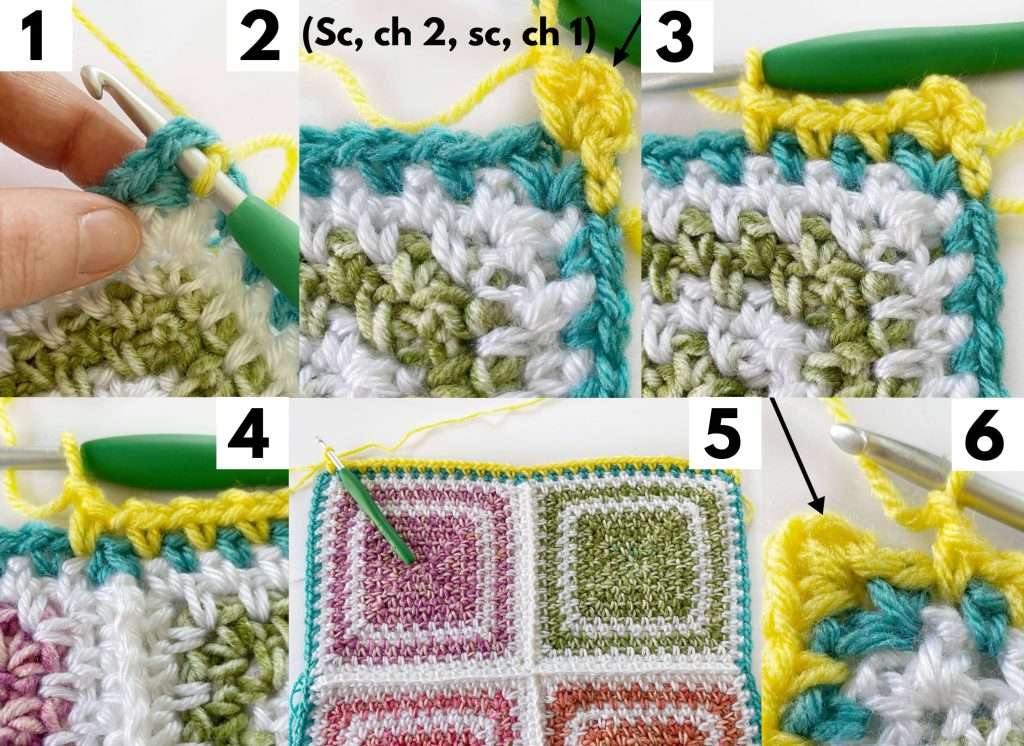
- Repeat Step 2 to join each column to the one beside it. When you reach a row join, crochet over top of it, so that it falls between the column join (Picture 5 & 6).
Border:
Notes:
- The beginning ch of each rnd does not count as a st.
- Do not turn at the end of each rnd.
- Make sure that the RS is facing you.
- Mark the inner corner ch-2 sps of each square along the perimeter of the blanket with stitch markers.
- Insert hook into the top-right corner ch-2 sp of blanket. Pick up Colour B with your hook and pull it through the ch-2 sp to fasten on. Ch 1.
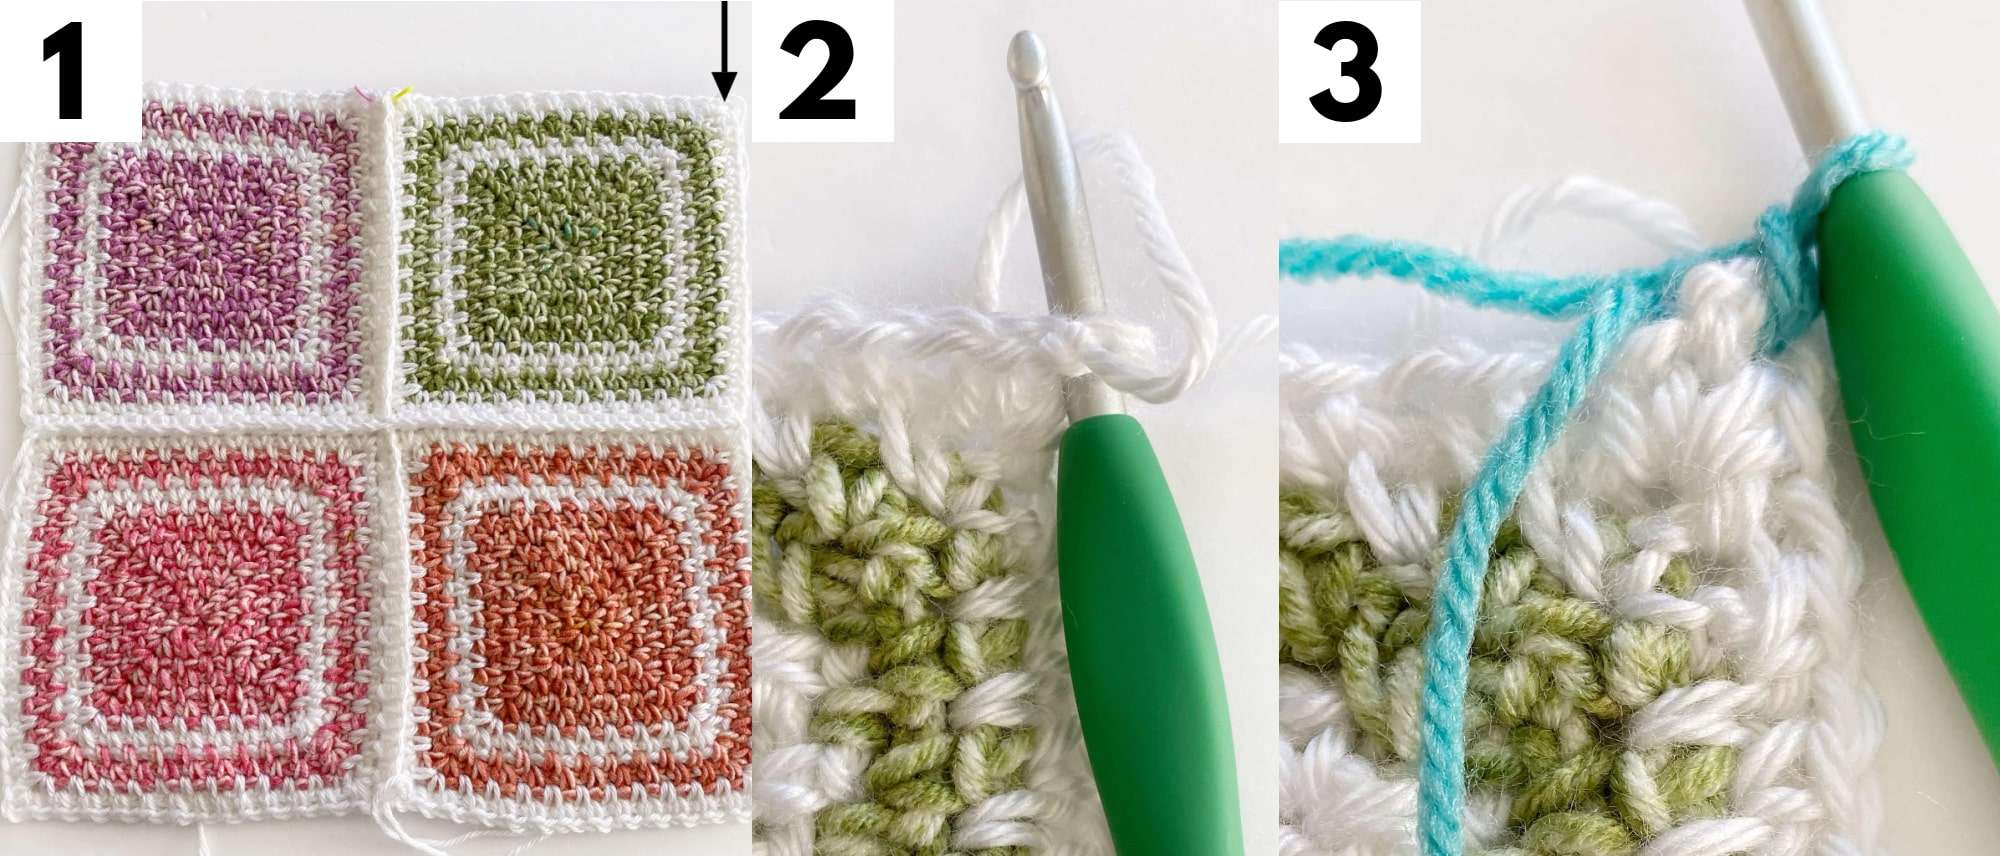
Rnd 1 (RS):
Top of Blanket:
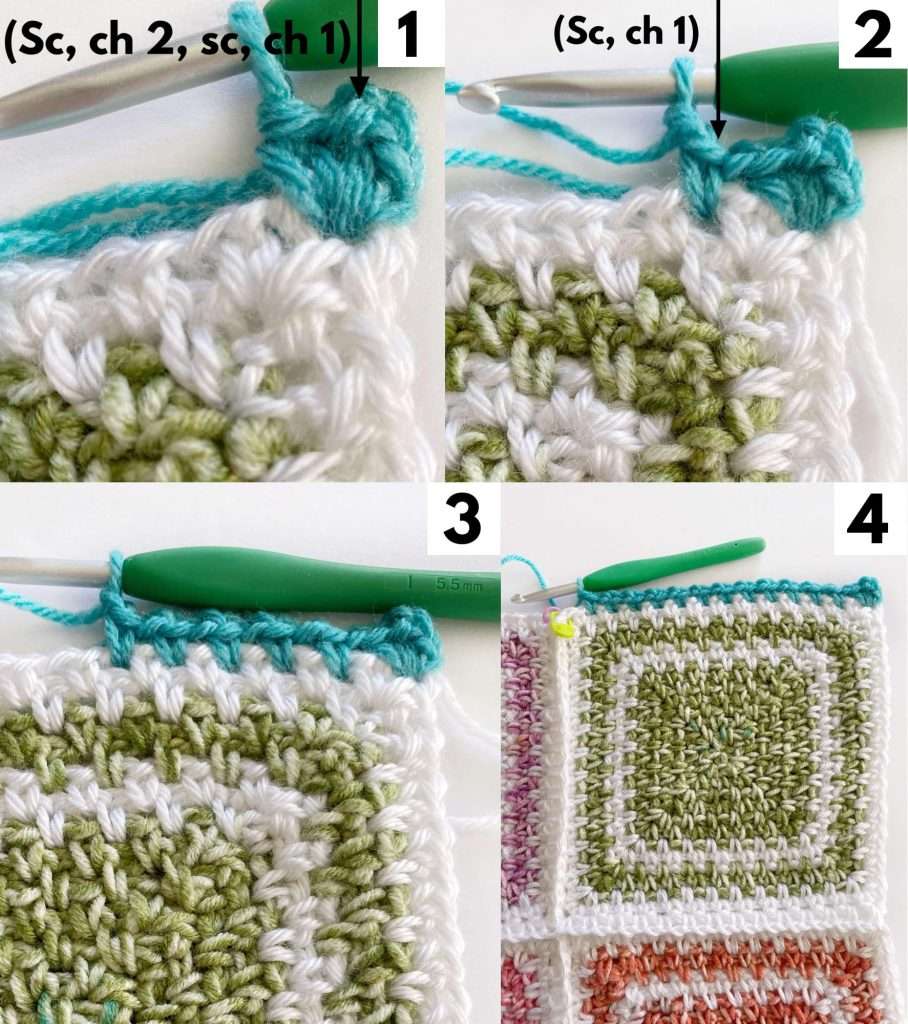
- *(Sc, ch 2, sc, ch 1) in first corner ch-2 sp, [(sc, ch 1) in ch-1 sp] 12 times.
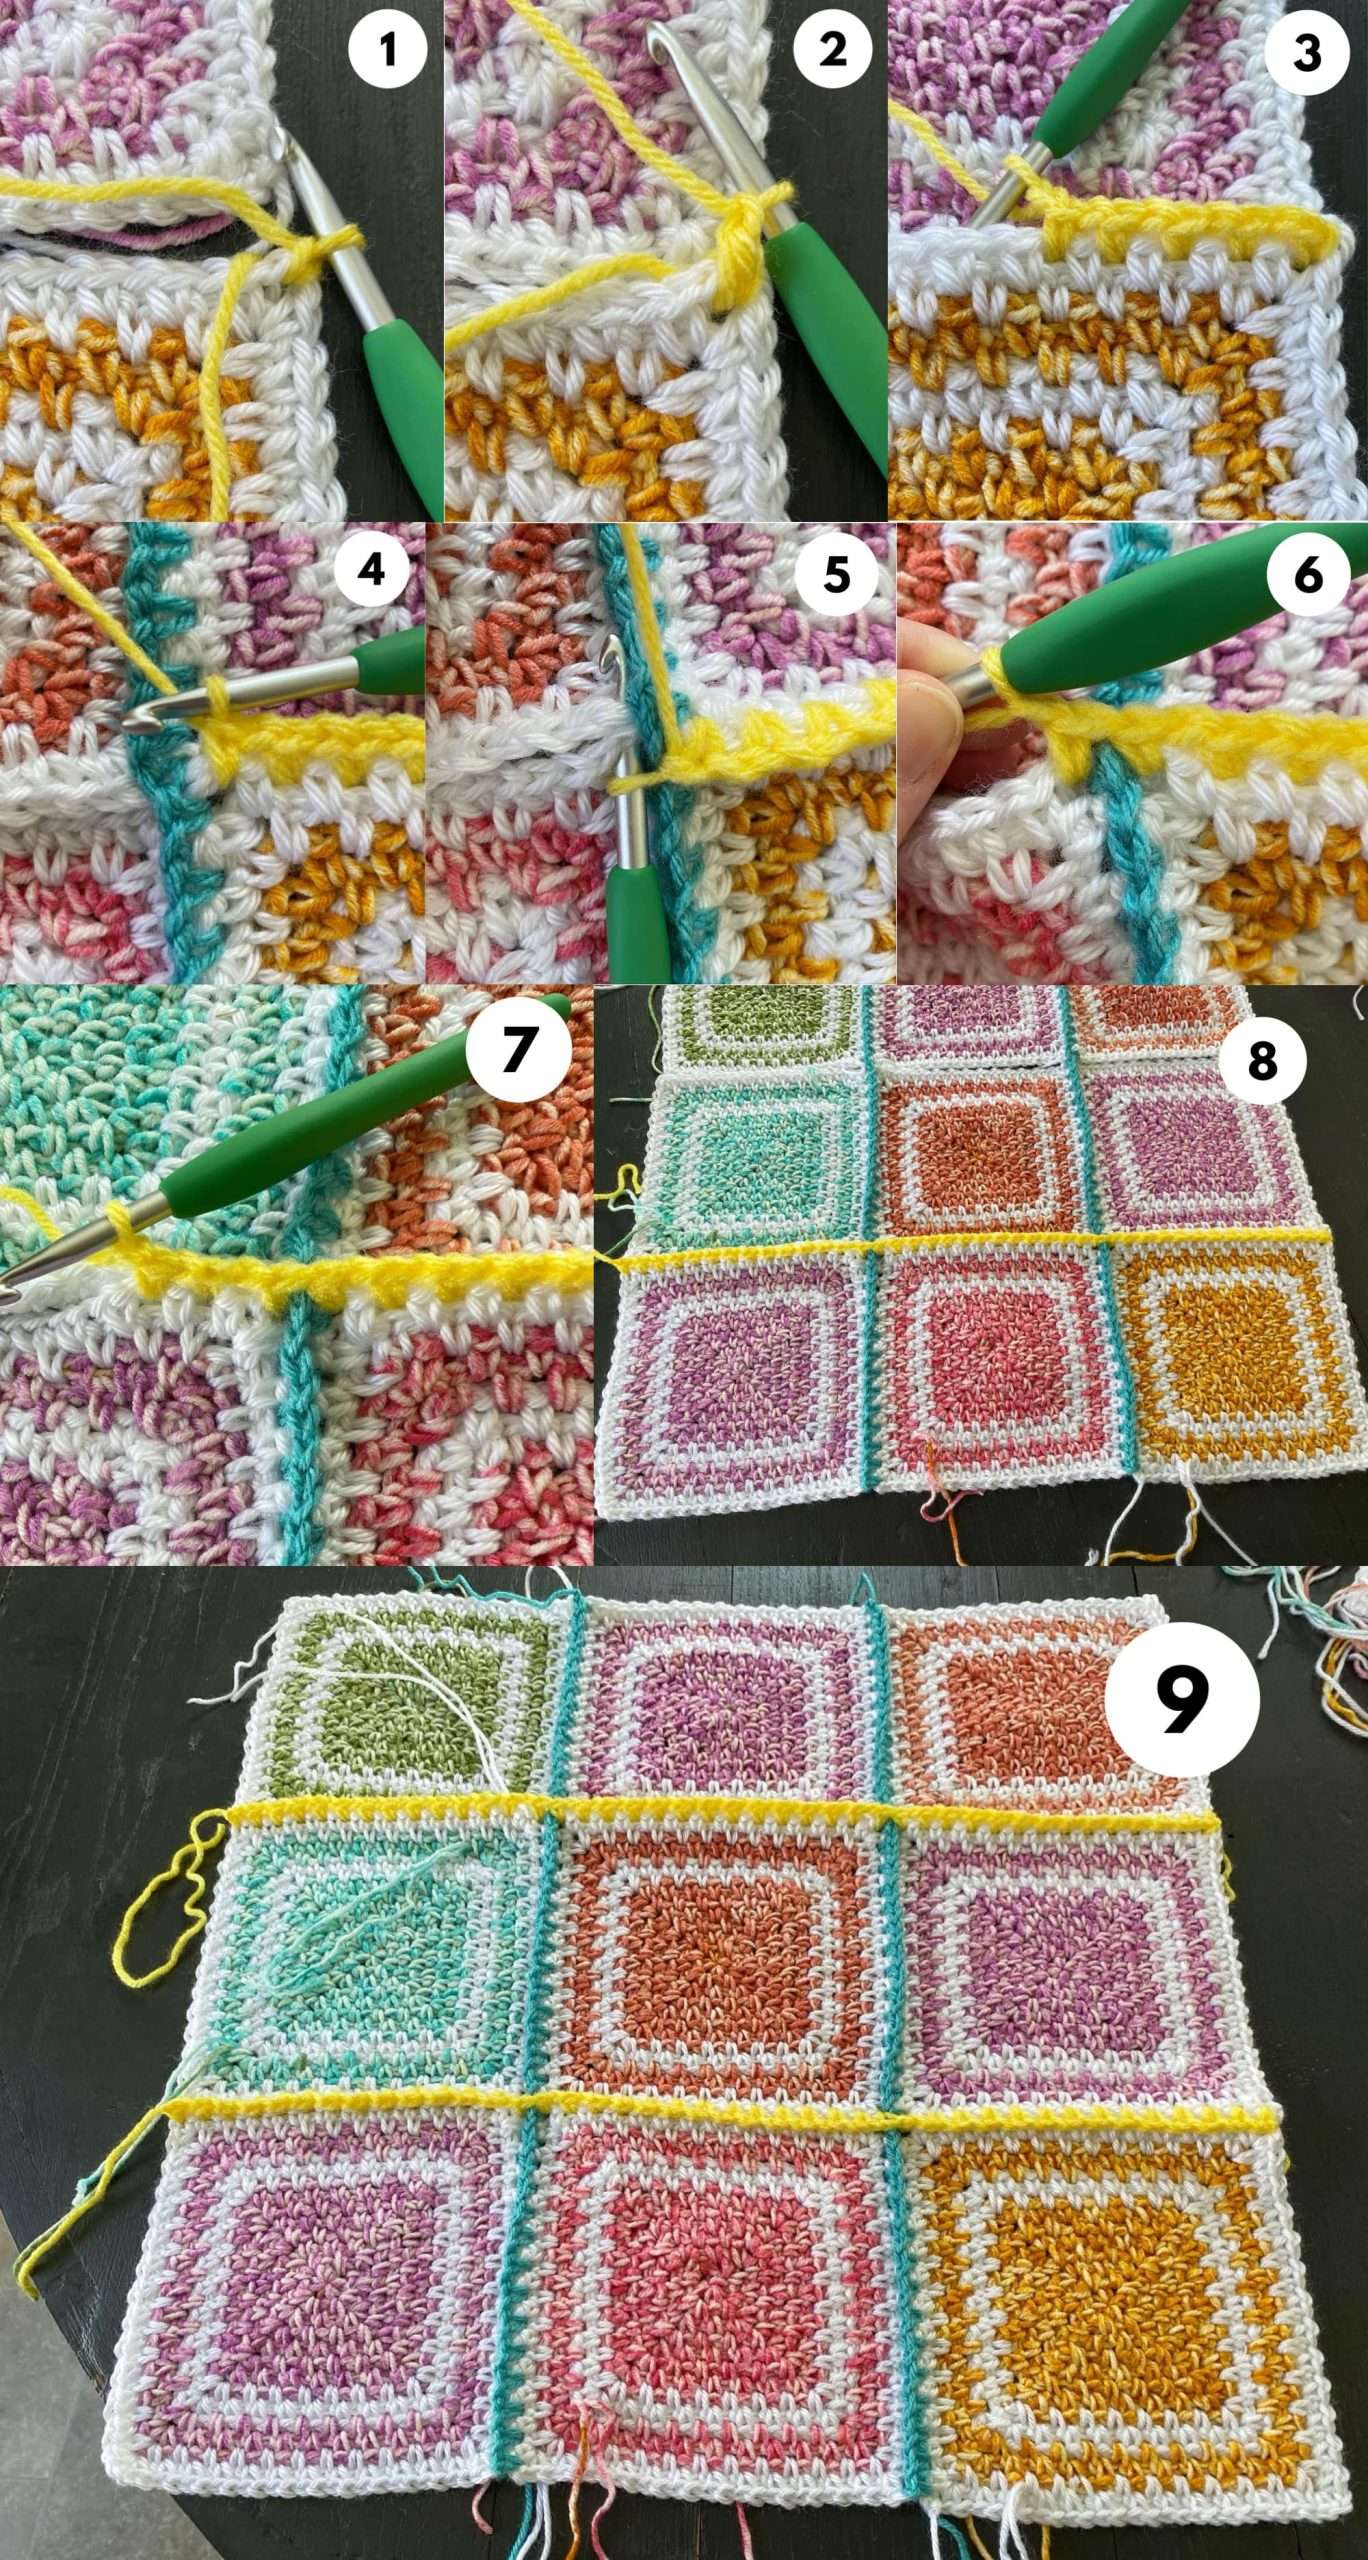
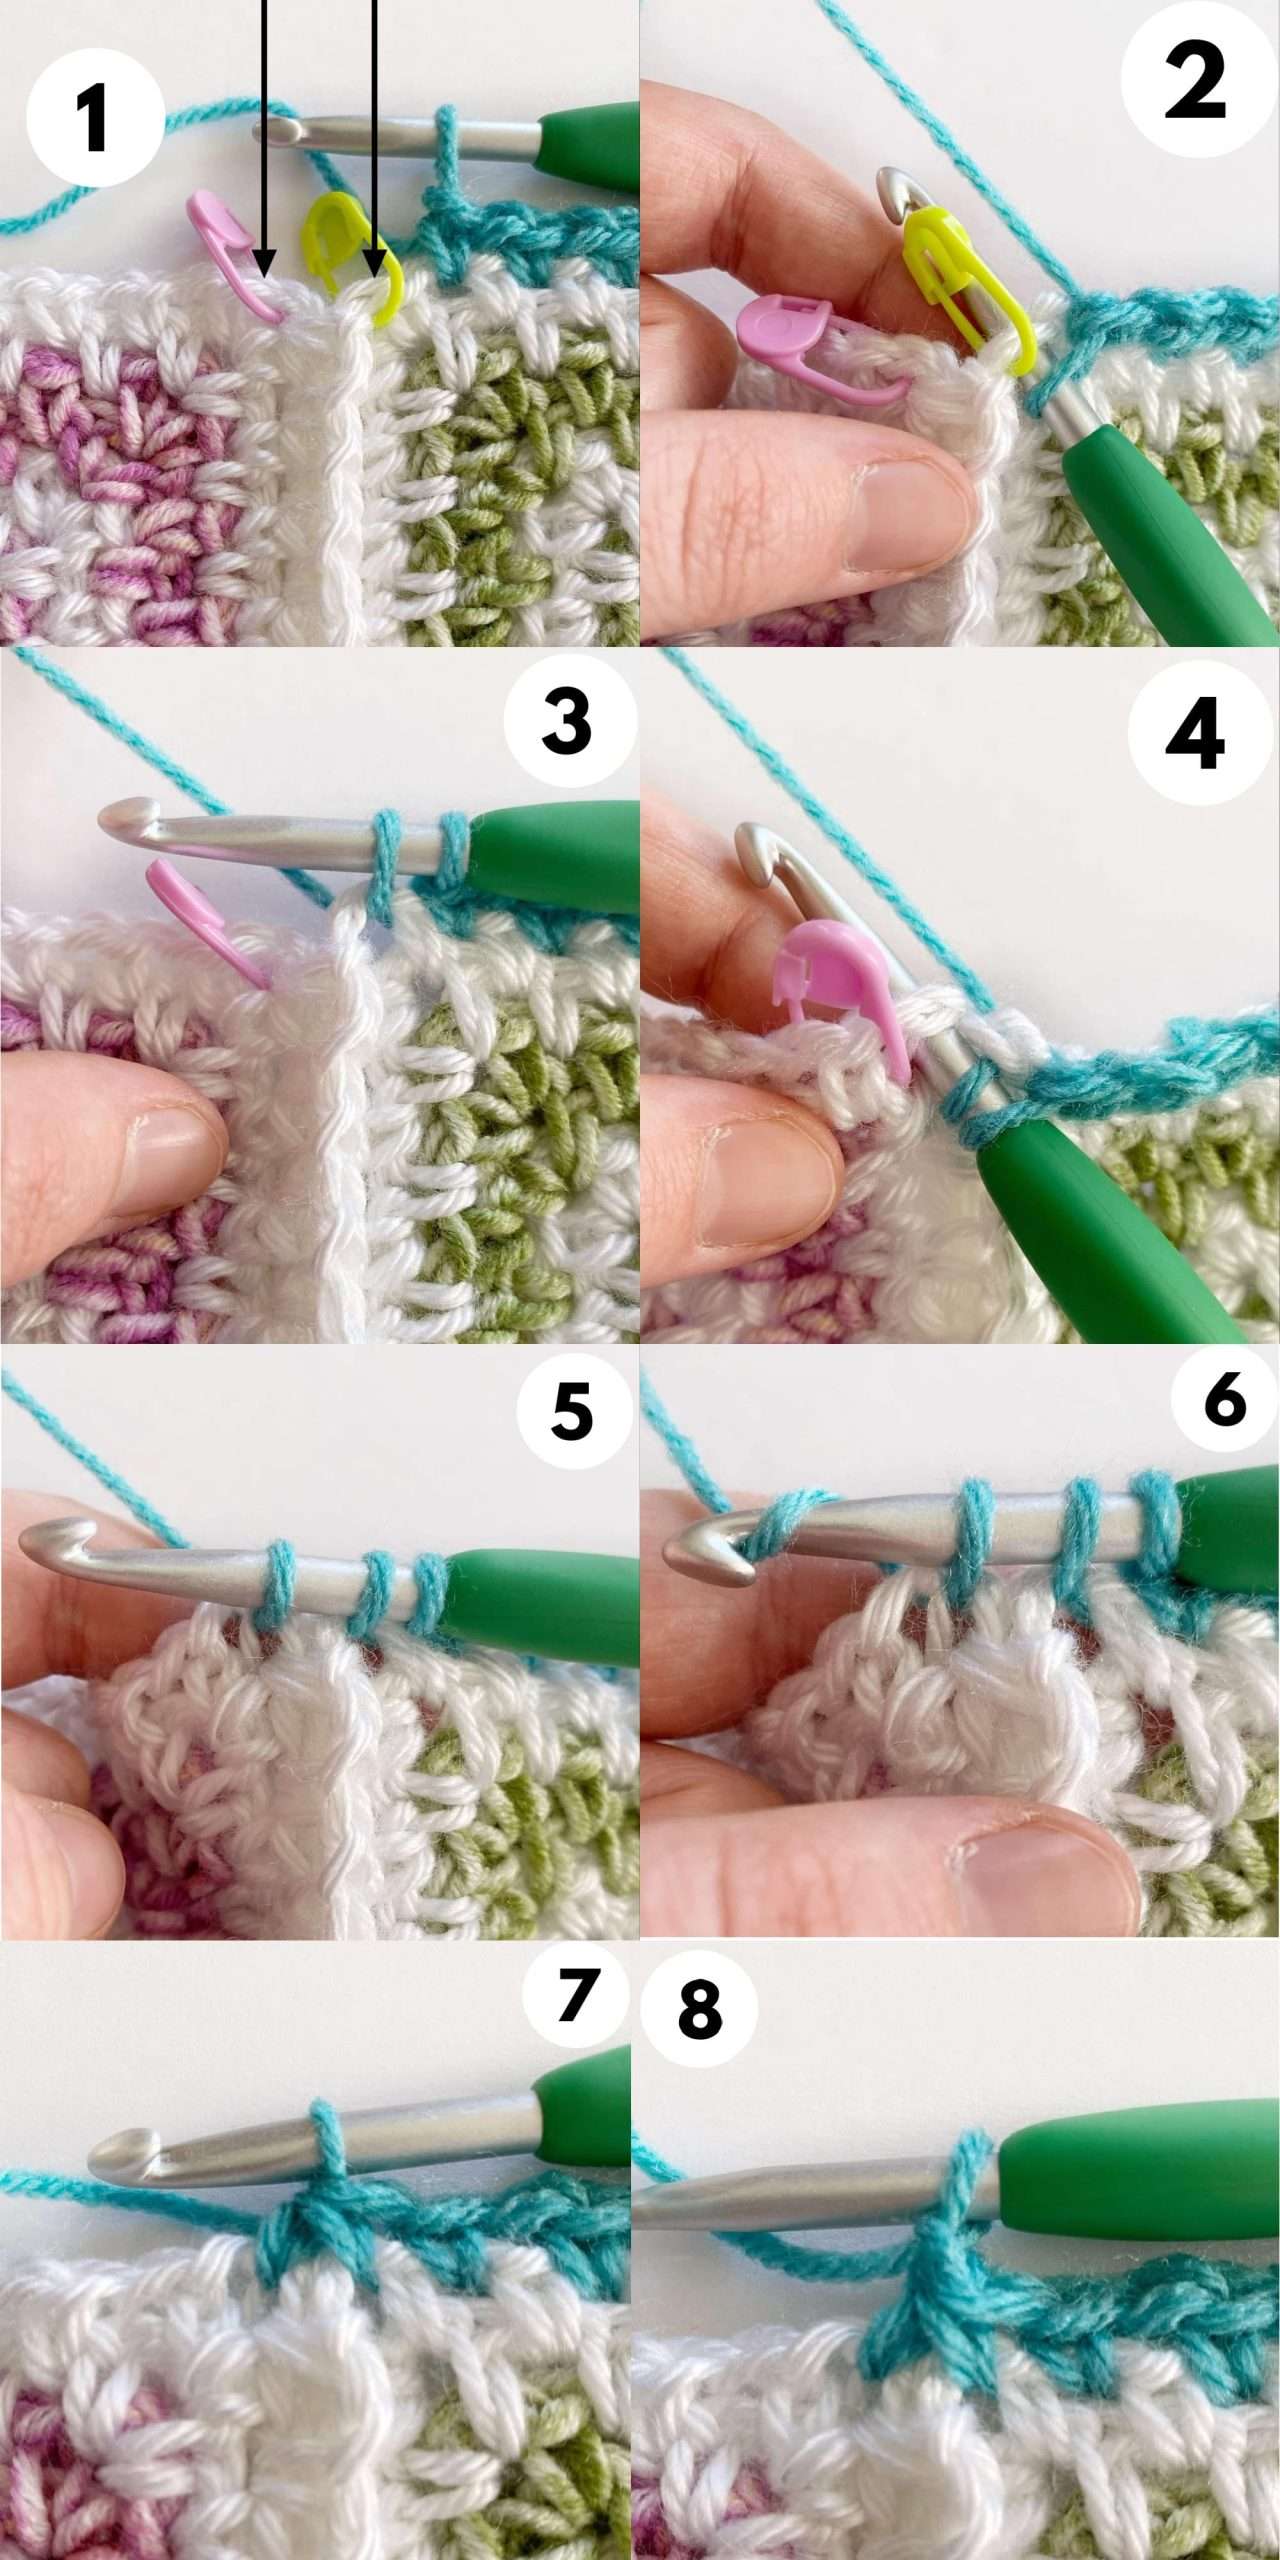
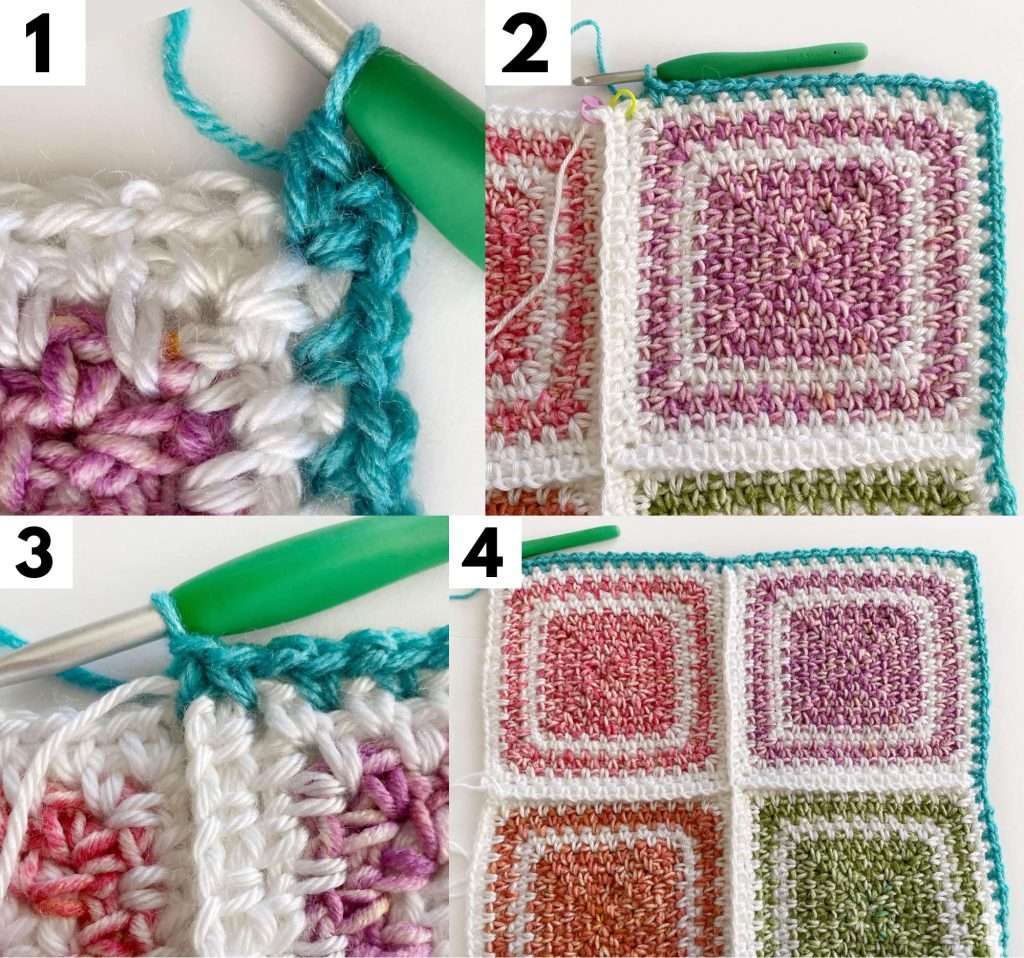
- Sc2tog across last corner ch-2 sp of current square and first corner ch-2 sp of next square (Picture 1).
Sc2tog:
- Insert hook into last corner ch-2 sp of current square. YO and draw up a loop – 2 loops on the hook (Picture 2 & 3).
- Insert hook into first corner ch-2 sp of next square. YO and draw up a loop – 3 loops on the hook (Picture 4 & 5).
- YO and pull through all 3 loops on the hook. (Picture 6 & 7)
- Ch 1. (Picture 8)
- {[(Sc, ch 1) in ch-1 sp] 12 times, sc2tog across last corner ch-2 sp of current square and first corner ch-2 sp of next square} until you reach the last square.
- Last Square: [(Sc, ch 1) in ch-1 sp] 12 times. Rotate the blanket to work along the next side.**
Left Side, Bottom, and Right Side of Blanket:
- Repeat the instructions from * to ** along the next 3 sides of the blanket.
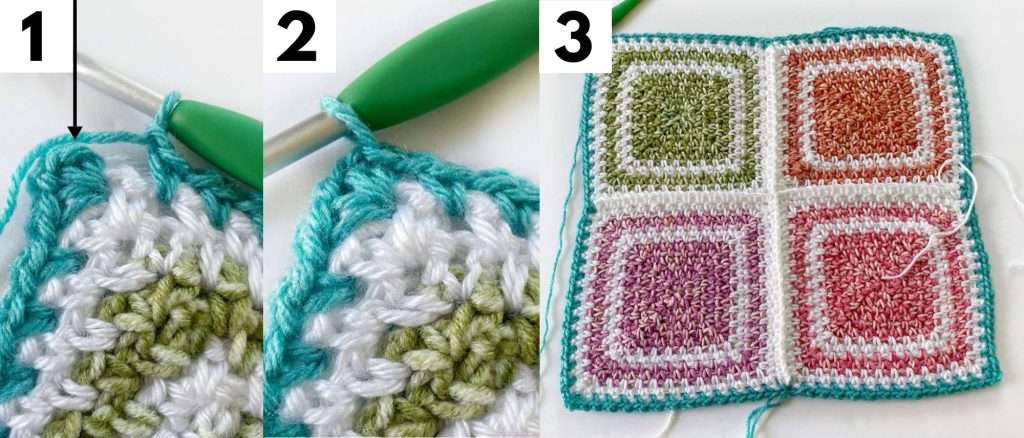
- When you reach the first corner – (sc, ch 2, sc) at the top of the blanket – sl st into the first sc to join. Do not turn.
Rnd 2 (RS):
With Colour B, sl st into first corner ch-2 sp, ch 1, [(sc, ch 2, sc, ch 1) in corner ch-2 sp, (sc, ch 1) in each ch-1 sp until next corner ch-2 sp] 4 times. Sl st into the first sc of the rnd to join.
Rnd 3 (RS):
With Colour B, repeat Rnd 2. Fasten off of Colour B.
Rnds 4 – 5 (RS):
Fasten on with Colour A in the first corner ch-2 sp.
With Colour A, repeat Rnd 2.
Rnd 6 (RS):
With Colour A, sl st into the first corner ch-2 sp to start.
Ch 2, 8 dc in first ch-2 sp, [sk 1 ch-sp, sl st in next ch-sp, sk 1 ch-sp, 8 dc in next ch-sp] around. Sl st in first dc of the rnd to join. Fasten off and weave in ends.
Blocking your Moss Stitch Square Blanket:
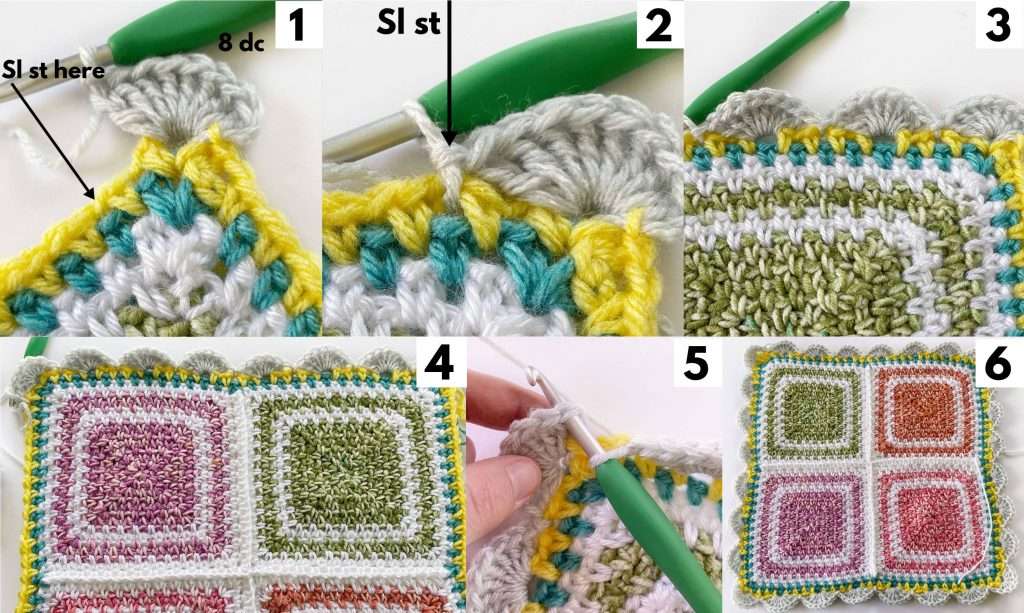
Blocking is the process of wetting a piece of crochet to make the ends and rows straight. To block this blanket, you will need a steamer / spray bottle / iron (with steam setting), straight pins, and a blocking mat / foam.
- Block your work by stretching out the blanket (vertically and horizontally), and placing straight pins along each side of the blanket to hold it in place.
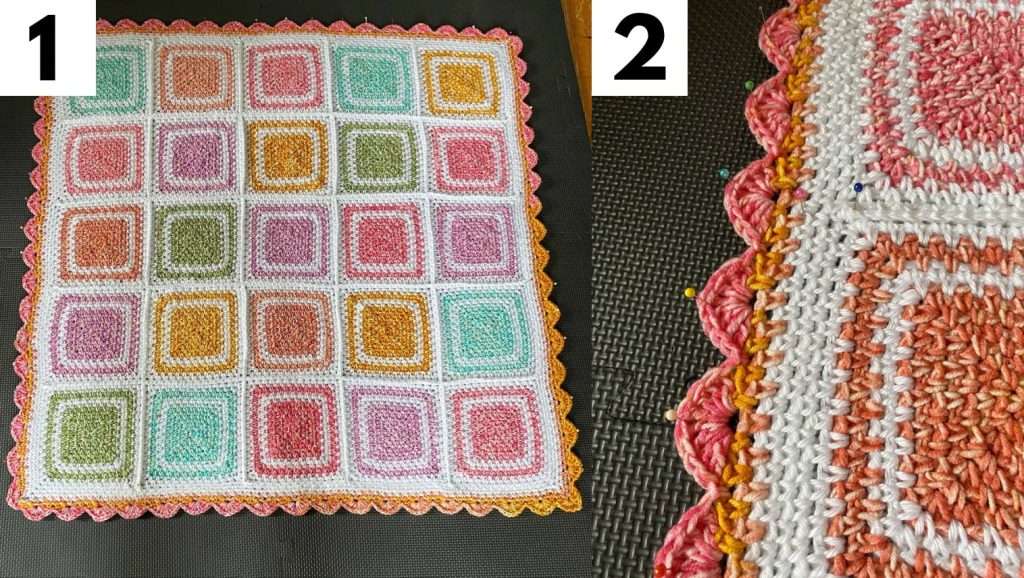
- Place a pin in each fan along the border, and a pin into the side of each column and row join.
- Spray the blanket with water, use a steamer, or an iron on steam setting. Let the blanket dry completely before unpinning it.
Questions?
If you have any questions about the Cotton Candy Parade Moss Stitch Square Blanket, please send me an email through my contact page. I am happy to help!
End Notes:
Yay! You just made your first Cotton Candy Parade Moss Stitch Square Blanket. I hope you enjoy making and using your blanket! If you’d like to make more crochet blankets, explore some crochet patterns by clicking on the button below.
Disclaimer: You are welcome to sell items that you’ve made from this pattern; however, you are not allowed to use my pictures, make Youtube video tutorials for the pattern, or sell/market my pattern as your own (Copyright @ ThisPixieCreates).
I hope you have a wonderful day!
Love, Dayna